Underrated Gym Machines That Maximize Your Results
Unlock Hidden Gains with These Overlooked Gym Gems
When it comes to gym equipment, most people flock to the usual suspects: treadmills, dumbbells, and barbells. But what if we told you some of the most effective machines are often overlooked? These underrated gym machines can help you break through plateaus, target neglected muscle groups, and add variety to your workouts. Let’s dive into the hidden gems of the gym that can maximize your results!
10 Steps to Maximize Your Results with Underrated Gym Machines
Step 1: Discover the Landmine Attachment
The landmine attachment is one of the most underrated yet effective tools in strength training. Despite its versatility, it often goes unnoticed in gyms, overshadowed by barbells, dumbbells, and cable machines. However, once you learn how to use it, the landmine can elevate your workouts and help you build strength, stability, and power.
Why the Landmine Attachment Is Overlooked?
Many gym-goers skip the landmine attachment simply because they:
- Aren’t Familiar With It: Unlike barbells or machines, the landmine isn’t commonly taught in beginner workouts.
- Don’t Know How to Use It Effectively: Without proper guidance, people may not realize its full potential.
- Think It’s Less Effective Than Free Weights: While free weights are great, the landmine offers unique benefits that can complement any routine.
If you’ve never used a landmine before, now’s the time to give it a try!
Benefits of the Landmine Attachment
1. Core Engagement
The landmine forces your core to stabilize during every movement, making it an excellent tool for building core strength. Whether you’re doing presses, rows, or rotational exercises, your abs, obliques, and lower back all work together to keep you balanced.
2. Joint-Friendly Training
Unlike barbells and dumbbells, the landmine moves through a fixed arc of motion. This reduces stress on your:
- Shoulders: Great for pressing movements without the strain of overhead barbell lifts.
- Elbows and Wrists: The neutral grip positions are more comfortable than traditional barbell exercises.
- Knees and Lower Back: The angled movement pattern makes squatting and lunging easier on the joints.
3. Versatility for Strength and Conditioning
The landmine is one of the most versatile attachments in the gym. It allows you to perform:
- Presses: Landmine shoulder presses are a great alternative to overhead barbell presses.
- Rows: Bent-over landmine rows strengthen your upper back.
- Squats and Lunges: Landmine squats and lunges provide lower-body strength without heavy spinal loading.
- Rotational Movements: Landmine twists and Russian twists improve core stability and power.
Suggestion: Looking to upgrade your home gym? The Rogue Landmine Attachment is a durable and space-saving option for landmine training.

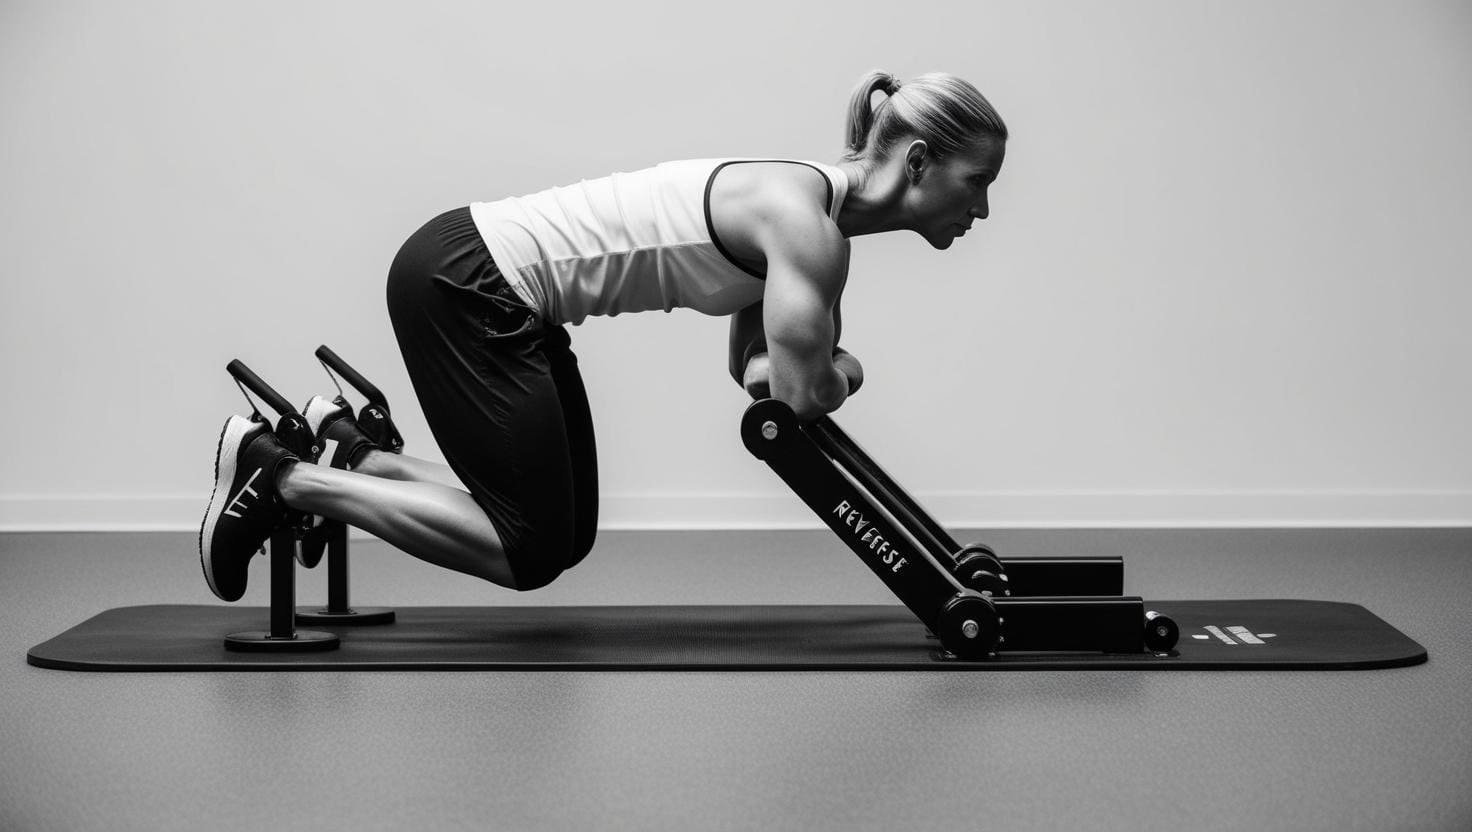
Step 2: Master the Reverse Hyperextension Machine
The reverse hyperextension machine is one of the most underrated pieces of gym equipment. While commonly used in rehab settings and powerlifting gyms, it deserves a place in any fitness routine. Whether you’re recovering from an injury, strengthening your posterior chain, or looking for a safer way to train your lower back, this machine is a game-changer.
Why the Reverse Hyperextension Machine Is Overlooked
Many gym-goers avoid the reverse hyperextension machine because they:
- Think It’s Only for Athletes or Rehab Patients: While it’s great for injury recovery, it’s also a powerful tool for strength building.
- Don’t Know How to Use It Properly: Without proper guidance, people may not realize its full benefits.
- Underestimate Its Effectiveness: Since it’s not a traditional squat or deadlift movement, some assume it’s not as useful for lower-body training.
However, this machine can be the missing piece in your training routine for stronger glutes, hamstrings, and a healthier spine.
Benefits of the Reverse Hyperextension Machine
1. Spinal Decompression
Unlike traditional lower-back exercises like deadlifts or back extensions, the reverse hyperextension gently decompresses the spine. This makes it an excellent option for:
- Relieving lower back pain
- Improving spinal mobility
- Preventing injuries caused by spinal compression from heavy lifting
2. Superior Glute and Hamstring Activation
Few exercises target the glutes and hamstrings as effectively as the reverse hyperextension. The movement allows for full hip extension, ensuring maximum muscle engagement. This helps with:
- Building stronger, more powerful glutes
- Developing well-balanced hamstrings
- Improving athletic performance in running, jumping, and lifting
3. Injury Prevention and Rehab
By strengthening the entire posterior chain (lower back, glutes, and hamstrings), the reverse hyperextension reduces the risk of injuries. It’s especially beneficial for:
- Athletes who need explosive power and stability
- Lifters recovering from lower back injuries
- Anyone looking to improve posture and prevent back pain
Suggestion: If you’re looking to add this to your home gym, the Rogue Reverse Hyper is a top-rated option for durability and performance.
How to Use the Reverse Hyperextension Machine Properly
Try This
- Start with Light Weight: Focus on controlled reps before adding resistance.
- Maintain a Neutral Spine: Avoid excessive swinging or arching.
- Squeeze Your Glutes at the Top: Pause at the peak for maximum muscle activation.
- Perform 3–4 Sets of 10–15 Reps: Ideal for both strength and endurance training.
Step 3: Conquer the Assisted Pull-Up/Dip Machine
The assisted pull-up/dip machine is an underrated powerhouse for upper-body strength training. While some gym-goers shy away from it, thinking it’s only for beginners, this machine can benefit everyone—from complete novices to experienced lifters looking to refine their form and increase reps.
Why the Assisted Pull-Up/Dip Machine Is Overlooked?
Many people avoid this machine due to:
- Feeling Intimidated by Pull-Ups and Dips: Some assume they need to be strong enough for unassisted versions before using the machine.
- Thinking It’s Only for Beginners: While it helps beginners build strength, advanced lifters can use it to improve endurance and refine technique.
- Underestimating Its Effectiveness: Some believe bodyweight or weighted pull-ups and dips are the only way to progress, but this machine provides a structured way to build up to those exercises.
In reality, this machine is a fantastic tool for developing upper-body strength, improving form, and progressing toward unassisted movements.
Benefits of the Assisted Pull-Up/Dip Machine
1. Accessible for All Fitness Levels
The machine allows you to adjust the level of assistance, making it a great option for both beginners and advanced lifters.
- Beginners: Start with higher assistance to build strength and confidence.
- Intermediate Lifters: Reduce assistance over time to gradually transition to bodyweight pull-ups and dips.
- Advanced Lifters: Use minimal assistance for high-rep sets or perfect your technique.
2. Builds a Strong Upper Body
Both pull-ups and dips target multiple muscle groups, making them some of the most effective upper-body exercises:
- Pull-Ups: Strengthen the back, biceps, and shoulders.
- Dips: Target the chest, triceps, and shoulders.
By using this machine, you can work on both exercises in a controlled manner, improving muscle activation and overall strength.
3. Core Engagement and Stability
Pull-ups and dips require a strong core to maintain proper form. Using the assisted machine still engages your core, helping you develop better stability and control.
4. Reduces Injury Risk
For those who struggle with strict pull-ups or dips, attempting them without proper strength or form can lead to injuries. The assisted machine provides support, allowing you to build strength safely and gradually.
Suggestion: The Pull-Up/Dip Station is a solid option for home gyms, offering durability and smooth assistance adjustment.

How to Use the Assisted Pull-Up/Dip Machine for Maximum Gains
Try This Progression Plan:
- Start with Higher Assistance (50–70% of body weight)
- Gradually Reduce Assistance (decrease by 5–10 lbs every few weeks)
- Increase Reps and Time Under Tension (slow, controlled movements)
- Transition to Unassisted Reps (mix in band-assisted or eccentric pull-ups)
Aim for 3–4 sets of 8–12 reps for both pull-ups and dips, adjusting assistance as needed.
Step 4: Dominate the Glute-Ham Developer (GHD)
The Glute-Ham Developer (GHD) is one of the most underutilized yet powerful machines in the gym. While it’s often associated with elite athletes and CrossFit enthusiasts, the GHD is beneficial for anyone looking to build lower-body strength, improve core stability, and prevent injuries.
Why the GHD Is Overlooked?
Many gym-goers avoid the GHD because:
- It Looks Intimidating: The setup and movement mechanics can be confusing for beginners.
- It’s Seen as an Advanced Tool: While it’s popular in powerlifting, Olympic lifting, and CrossFit, people often think it’s only for high-level athletes.
- Lack of Awareness: Some simply don’t know the benefits of training on the GHD.
However, once you learn how to use it properly, the GHD becomes an essential tool for developing lower-body strength and core stability.
Benefits of the Glute-Ham Developer
1. Builds Posterior Chain Power
The GHD targets key posterior chain muscles:
- Glutes – Essential for hip extension and lower-body power.
- Hamstrings – Strengthened in both knee flexion and hip extension, improving athletic performance.
- Lower Back – Helps reinforce spinal stability and strength for compound lifts like squats and deadlifts.
Stronger posterior chain muscles lead to better performance in lifts, sprints, and sports while reducing injury risk.
2. Develops Core Strength
GHD sit-ups are far more challenging than traditional crunches or hanging leg raises. The extended range of motion forces your core to work harder, improving strength and endurance.
3. Prevents Injuries
Weak hamstrings and glutes are common culprits behind knee pain, lower back issues, and hamstring strains. The GHD helps strengthen these muscles, reducing injury risk and improving overall stability.
4. Enhances Sprint Speed and Jump Power
Athletes and fitness enthusiasts who want to improve explosiveness will benefit from GHD training. Stronger glutes and hamstrings translate to faster sprints, higher jumps, and more powerful movements.
Suggestion: The GHD Machine is a high-quality option for home or gym use, offering excellent durability and adjustability.

How to Use the GHD for Maximum Gains?
Try These Exercises
- Glute-Ham Raises – Strengthen your hamstrings and improve knee flexion control.
- Back Extensions – Target your lower back and glutes while reinforcing spinal stability.
- GHD Sit-Ups – Engage your entire core with an extended range of motion for better ab strength.
Progression Plan
- Beginner: Start with partial-range back extensions and assisted glute-ham raises.
- Intermediate: Perform full-range glute-ham raises and controlled sit-ups.
- Advanced: Add resistance (weight plate or banded tension) for increased difficulty.
Aim for 3–4 sets of 8–12 reps for each exercise, gradually increasing difficulty over time.
Step 5: Push and Pull with the Sled
The sled is one of the most effective yet underrated pieces of gym equipment. While it’s commonly associated with athletes and sports performance training, the sled is an incredible tool for anyone looking to build strength, power, and endurance. Whether you’re training for muscle growth, fat loss, or overall fitness, sled work can elevate your workouts.
Why the Sled Is Overlooked?
Many gym-goers don’t use the sled because:
- It’s Seen as an Advanced Tool: People assume it’s only for athletes or hardcore trainers.
- Lack of Knowledge: Many don’t realize the sled’s versatility for both strength and cardio.
- No Complex Programming Needed: Since sled training doesn’t require intricate techniques, some overlook its effectiveness.
But once you incorporate sled training into your routine, you’ll see why it’s a game-changer.
Benefits of Sled Training
1. Full-Body Workout
Sled pushes and pulls engage multiple muscle groups in one movement, including:
- Legs – Quadriceps, hamstrings, glutes, and calves all work together.
- Core – Stabilization is required to maintain posture and control.
- Upper Body – When pulling the sled or using a rope, your back, shoulders, and arms get involved.
2. Low-Impact Training
Unlike running, sled work is easy on the joints while still being highly effective for improving endurance and power. This makes it an excellent option for individuals with knee, ankle, or hip issues who still want to train explosively.
3. Improves Strength & Power
Sled training builds functional strength that translates to real-world movements, such as sprinting, jumping, and lifting. Whether you’re training for sports or general fitness, sled work enhances lower-body power without excessive wear and tear.
4. Enhances Conditioning Without Running
If you hate running but want to improve cardiovascular fitness, sled pushes and pulls are a great alternative. They provide an intense cardio workout without the repetitive impact of jogging or sprinting.
5. Versatile for Any Training Goal
- For Strength: Load the sled with heavy weight and push or pull for short, explosive sets.
- For Fat Loss & Conditioning: Use lighter weights and push or drag the sled for longer distances with minimal rest.
- For Speed & Agility: Sprint with an unloaded or lightly loaded sled to improve acceleration.
Suggestion: The Sled is an excellent, adjustable-resistance sled for home and gym use.

How to Use the Sled for Maximum Gains
Try These Sled Exercises:
- Sled Pushes (Heavy & Light Variations) – Drive through your legs to build lower-body power and endurance.
- Sled Pulls (Backward & Forward) – Strengthen your quads, hamstrings, and grip.
- Rope Pulls – Use a battle rope or strap for an upper-body and grip challenge.
- Lateral Drags – Improve side-to-side movement strength, ideal for athletes and injury prevention.
Step 6: Explore the Functional Trainer (Dual Cable Machine)
The functional trainer, also known as the dual cable machine, is one of the most versatile pieces of gym equipment. While many gym-goers use it for basic cable exercises, they often overlook its full potential. This powerhouse machine allows for an endless variety of movements, making it a staple for strength training, rehabilitation, and functional fitness.
Why the Functional Trainer Is Overlooked?
Despite being a staple in many gyms, the functional trainer is often underutilized because:
- Lack of Awareness – Many people don’t realize how many exercises can be performed with this machine.
- Preference for Free Weights – Traditional dumbbells and barbells dominate strength training, overshadowing the benefits of cables.
- Complex Adjustments – Some users find it tricky to adjust the pulleys, so they avoid using it.
However, once you understand its benefits, the functional trainer can become your go-to machine for full-body workouts.
Benefits of the Functional Trainer
1. Unlimited Exercise Variety
The functional trainer allows you to perform hundreds of exercises, including:
- Upper Body – Cable chest flys, rows, lat pulldowns, shoulder presses
- Lower Body – Cable squats, lunges, glute kickbacks
- Core – Cable woodchoppers, Pallof presses, resisted rotations
Whether you’re a beginner or advanced lifter, the dual cables let you customize resistance and movement patterns to fit your needs.
2. Constant Tension for Maximum Muscle Activation
Unlike free weights, which rely on gravity, cables provide consistent resistance throughout the entire range of motion. This helps maximize muscle engagement, especially during isolation exercises like bicep curls and triceps pushdowns.
3. Joint-Friendly Resistance
Because the cables allow for smooth, controlled movements, they put less stress on the joints compared to barbells or dumbbells. This makes the functional trainer an excellent option for people recovering from injuries or those looking to prevent joint strain.
4. Space-Saving Design for Home Gyms
For those building a home gym, a functional trainer can replace multiple machines like a lat pulldown, pec deck, and smith machine. It’s a compact, all-in-one solution for strength training.
Suggestion: The Functional Trainer is a top-rated choice for home and commercial gyms.

Best Functional Trainer Exercises
Upper Body
- Cable Chest Flys – Targets the chest with constant tension for better muscle activation.
- Single-Arm Cable Rows – Improves back strength and muscular imbalances.
- Overhead Shoulder Press – Strengthens shoulders while minimizing joint stress.
Lower Body
- Cable Squats – Adds resistance while allowing for a controlled movement pattern.
- Glute Kickbacks – A great way to isolate and activate the glutes.
- Cable Lateral Lunges – Engages the legs and core with a side-to-side motion.
Core & Functional Strength
- Woodchoppers – Builds rotational strength and works the obliques.
- Pallof Press – A top exercise for core stability and anti-rotation strength.
- Resisted Side Steps – Strengthens the hips and improves mobility.
Step 7: Crush It with the Vertical Leg Press
The vertical leg press is an underrated yet highly effective lower-body exercise machine. Unlike the standard leg press, which has you pressing forward or at a 45-degree angle, the vertical version has you pressing straight up against gravity. This unique positioning shifts more emphasis onto the quads and glutes while minimizing strain on the lower back.
Why the Vertical Leg Press Is Overlooked?
Despite its effectiveness, the vertical leg press isn’t as commonly used in gyms due to:
- Less Availability – Many gyms don’t have this machine, as the traditional leg press is more popular.
- Intimidation Factor – The idea of pressing weight straight up can seem daunting to beginners.
- Unfamiliar Setup – Some gym-goers aren’t sure how to get into the machine or safely load/unload weight.
However, once you learn how to use it properly, the vertical leg press can be a game-changer for leg gains.
Benefits of the Vertical Leg Press
1. Greater Quad Activation
The vertical angle places more tension on the quads, helping build stronger, more defined legs compared to traditional leg presses or squats.
2. Reduced Lower Back Strain
Unlike the standard leg press, the vertical version keeps your spine in a neutral position, reducing compression on the lower back. This makes it an excellent alternative for those with back issues.
3. Stronger Glute and Hamstring Engagement
Because of the vertical push motion, your glutes and hamstrings also get an intense workout, making it a great tool for posterior chain development.
4. Compact and Space-Saving
Many home gym enthusiasts prefer the vertical leg press because it takes up less space than a traditional leg press machine, making it a great option for smaller setups.
Suggestion: The Vertical Leg Press is a highly-rated choice for those looking to add this machine to their home gym.

Best Vertical Leg Press Variations
1. Standard Vertical Leg Press
- How to do it: Lay on the machine’s backrest with feet hip-width apart on the platform. Press upward, then lower with control.
- Muscles worked: Quads, glutes, hamstrings
2. Single-Leg Vertical Press (Unilateral Strength & Balance)
- How to do it: Perform the exercise with one foot on the platform, keeping the other leg extended.
- Why: Helps correct muscle imbalances and improves stability.
3. Wide-Stance Leg Press (More Glute & Hamstring Focus)
- How to do it: Place your feet wider than hip-width with toes slightly pointed out.
- Why: Shifts more emphasis to glutes and inner thighs.
4. Close-Stance Leg Press (More Quad Isolation)
- How to do it: Position feet close together in the center of the platform.
- Why: Increases quad activation for stronger front-leg muscles.
Step 8: Add Variety with the Smith Machine
The Smith machine often gets a bad reputation among gym-goers, with critics claiming it’s “unnatural” or “less effective” than free weights. However, when used correctly, it’s an excellent tool for strength training, stability, and muscle isolation—especially for those training without a spotter.
Why the Smith Machine is Underrated?
Despite its effectiveness, the Smith machine is often overlooked because:
- Fixed Bar Path – Some lifters believe it restricts natural movement, but this can actually be an advantage for controlled exercises.
- Overuse of Free Weights – Many gym-goers prefer barbells and dumbbells, overlooking the unique benefits of the Smith machine.
- Misconceptions – Some think it’s only for beginners, but even advanced lifters can benefit from Smith machine training.
The truth? The Smith machine offers safety, stability, and variety, making it a great addition to any workout routine.
Benefits of Using the Smith Machine
1. Increased Safety for Heavy Lifting
The guided bar allows for safer heavy lifts without needing a spotter. This makes it an excellent choice for solo workouts, especially for exercises like bench presses and squats.
2. More Controlled Movements
The fixed path reduces the need for stabilization, allowing you to focus on form and muscle activation. This is great for beginners learning proper technique and for isolating specific muscles.
3. Greater Versatility
The Smith machine isn’t just for squats! It can be used for a variety of exercises, including:
- Bench presses (flat, incline, and decline)
- Bulgarian split squats
- Shoulder presses
- Deadlifts
- Glute bridges
4. Ideal for Progressive Overload
Because the bar is fixed and stable, you can increase weight more confidently over time without worrying about balance issues.
Suggestion: If you’re considering a home gym setup, the Smith Machine is a top-tier option with multiple functions.

Best Smith Machine Exercises for Strength & Muscle Growth
1. Incline Bench Press (Upper Chest & Shoulders)
- How to do it: Set an adjustable bench to a 30-45° incline. Press the bar upward, keeping control through the movement.
- Why: Focuses on upper chest development with a safer pressing path.
2. Bulgarian Split Squats (Leg Strength & Stability)
- How to do it: Stand a few feet in front of the bar, with one foot elevated behind you. Lower into a deep lunge and press back up.
- Why: Targets the quads and glutes, improving single-leg strength.
3. Smith Machine Squats (Leg Power & Hypertrophy)
- How to do it: Position feet slightly forward under the bar. Squat down, keeping your chest up and core engaged.
- Why: The fixed bar path reduces lower back strain, making it a great alternative to barbell squats.
4. Shoulder Press (Delts & Upper Body Strength)
- How to do it: Adjust the bar to shoulder height, press it overhead, and lower with control.
- Why: Safer than free weights while allowing you to push heavier loads.
5. Glute Bridges/Hip Thrusts (Glutes & Posterior Chain)
- How to do it: Sit on the floor with your back against a bench, roll the bar over your hips, and drive your glutes upward.
- Why: Maximizes glute activation and strength gains.
Step 9: Strengthen Your Core with the Ab Roller
The ab roller is one of the most underrated tools for core strength and stability. While it looks simple, it provides a highly effective full-core workout that engages more muscles than traditional sit-ups or crunches.
Why the Ab Roller is Underrated?
Despite its effectiveness, the ab roller is often overlooked because:
- It Looks Too Simple – Many assume it’s not challenging enough compared to machines or weighted ab exercises.
- It’s Hard for Beginners – Without proper form, it can feel difficult, leading people to abandon it too soon.
- Lack of Awareness – Some gym-goers don’t realize that ab rollouts work the entire core, shoulders, and back.
The truth? Few exercises match the ab roller’s ability to build core strength and endurance when used correctly.
Benefits of Using the Ab Roller
1. Maximum Core Activation
The ab roller engages the entire core, including:
- Rectus abdominis (six-pack muscles) – Strengthens and defines your abs.
- Obliques – Improves rotational strength and stability.
- Transverse abdominis – Acts as a deep core stabilizer, protecting your spine.
- Lower back – Helps prevent injuries by improving overall core balance.
2. Improves Full-Body Stability
Unlike sit-ups, ab rollouts require core, shoulder, and back control, improving posture and balance.
3. Portable & Budget-Friendly
The ab roller is small, lightweight, and affordable, making it perfect for home workouts and travel.
4. Progressive Difficulty for All Fitness Levels
- Beginners: Start with knee roll-outs for controlled movement.
- Intermediate: Increase reps and extend range of motion.
- Advanced: Try standing roll-outs for an intense core challenge.
A high-quality ab roller like the Ab Carver offers extra stability and comfort for beginners and advanced users alike.

Best Ab Roller Exercises & Progressions
1. Kneeling Ab Rollouts (Best for Beginners)
How to do it:
- Start on your knees, holding the ab roller.
- Slowly roll forward, keeping your core tight.
- Roll back to the starting position without collapsing your lower back.
Focus: Core control and stability.
2. Standing Ab Rollouts (Advanced Core Strength)
How to do it:
- Stand with your feet shoulder-width apart.
- Slowly roll forward as far as you can while keeping control.
- Engage your core to return to standing.
Challenge: Requires serious core and upper body strength.
3. Ab Rollouts with Resistance Bands (Great for Progression)
How to do it:
- Attach a resistance band to a secure point behind you.
- Hold the ab roller while the band provides assistance.
- Roll out slowly and return with control.
Why? Helps beginners transition to full rollouts.
4. Side-to-Side Ab Rollouts (Targets Obliques)
How to do it:
- Perform the rollout at an angle instead of straight forward.
- Alternate sides to engage the obliques more intensely.
Best For: Core rotation and side abs definition.
Recommendation: The Ab Carver Pro is a top-rated ab roller with added resistance.
Supplement Pairing: Pair your ab workouts with BCAAs to support recovery.
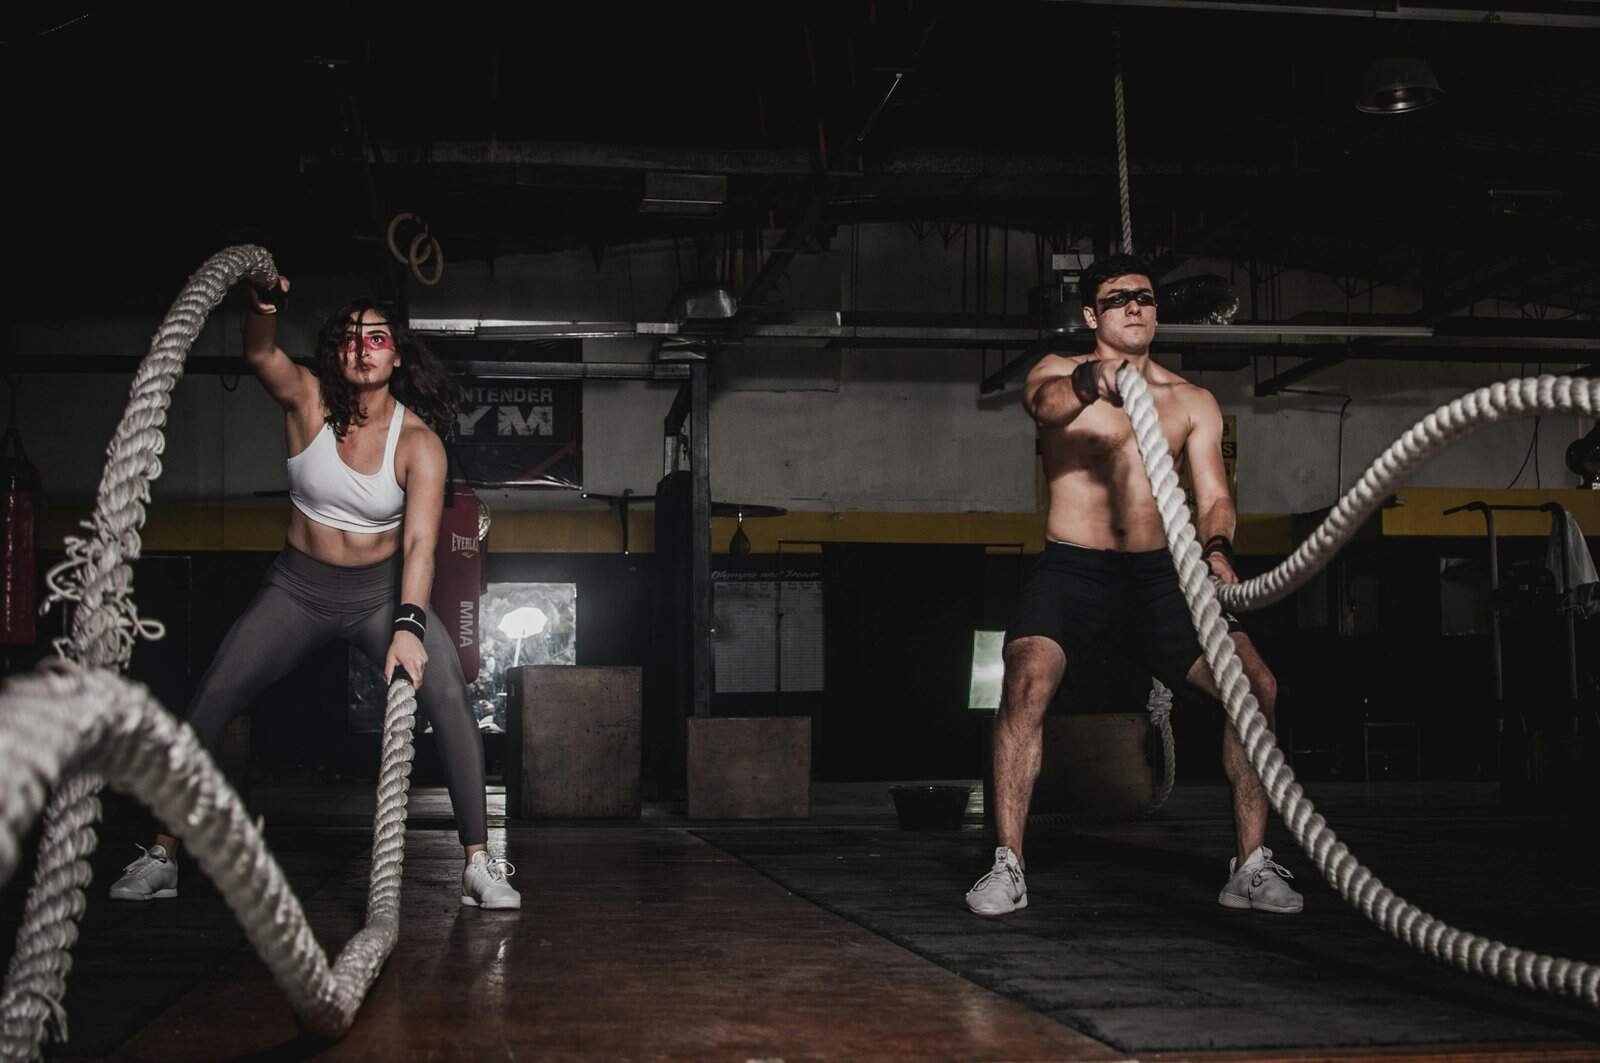
Step 10: Finish Strong with Battle Ropes
Battle ropes are an underrated yet highly effective tool for building endurance, strength, and power. While many associate them with cardio, they engage the entire body, making them a must-have for any workout routine.
Why Battle Ropes Are Underrated?
Despite their effectiveness, battle ropes are often overlooked because:
- They seem too simple—many assume they’re only good for short bursts of cardio.
- They’re intimidating—if you’ve never used them before, they can seem overwhelming.
- Lack of variety—some gym-goers don’t realize how many different exercises you can do with battle ropes.
But in reality, battle ropes combine cardio, strength, and endurance training into one!
Benefits of Battle Ropes
1. Full-Body Engagement
Battle ropes activate multiple muscle groups, including:
- Arms & Shoulders – Constant movement builds endurance and definition.
- Core – Your abs work hard to stabilize each movement.
- Legs & Glutes – Squatting and lunging variations add a lower-body burn.
2. HIIT-Friendly
Battle ropes are perfect for high-intensity interval training (HIIT), allowing you to:
- Burn more calories in less time.
- Improve cardiovascular endurance.
- Increase explosive power for sports and functional fitness.
3. Low-Impact, High-Intensity
Unlike running or jumping, battle ropes are joint-friendly while still delivering a heart-pounding workout.
4. Grip & Forearm Strength
Holding and swinging battle ropes strengthens your grip, which translates to better performance in deadlifts, pull-ups, and everyday tasks.
Best Battle Rope Exercises
1. Alternating Waves (Best for Beginners)
How to do it:
- Stand with feet shoulder-width apart.
- Hold one rope in each hand.
- Create alternating waves by moving one arm up while the other goes down.
Why? This builds endurance and engages the core, arms, and shoulders.
2. Double Slams (Explosive Power)
How to do it:
- Hold both ropes together.
- Squat down and slam the ropes to the ground with force.
- Stand up and repeat.
Why? Great for power, endurance, and fat loss.
3. Side-to-Side Waves (Core Focused)
How to do it:
- Move both arms side to side, keeping your core engaged.
- Control the movement rather than relying on momentum.
Best For: Strengthening the obliques and improving rotational power.
4. Battle Rope Jump Slams (Lower-Body Burn)
How to do it:
- Hold both ropes and jump as you slam the ropes down.
- Land softly in a squat and repeat.
Why? This engages the legs while keeping your heart rate up.
Why Trust Us?
We’re fitness enthusiasts who’ve spent years exploring gym equipment, supplements, and optimizing workouts. Our recommendations are based on real-world experience and a passion for helping others achieve their fitness goals.
Ready to Level Up Your Workouts?
Don’t let these underrated machines gather dust! Give them a try and experience the gains you’ve been missing. Pair them with the recommended supplements for even better results. Share your progress with us in the comments below—we’d love to hear how these machines have transformed your routine.
Frequently Asked Questions (FAQ)
1. What are the most underrated gym machines for muscle growth?
Many gym-goers overlook powerful machines like the landmine attachment, reverse hyperextension machine, and Glute-Ham Developer (GHD). These machines target specific muscle groups, improve functional strength, and reduce injury risk, making them essential for muscle growth and strength training.
2. Is the Smith machine good for strength training?
Yes! While some criticize the Smith machine for its fixed movement path, it’s great for controlled, heavy lifts without a spotter. It’s especially useful for squats, presses, and Bulgarian split squats, helping you progressively overload safely.
3. How does the reverse hyperextension machine benefit lower back health?
The reverse hyperextension machine is one of the best for spinal decompression, strengthening the glutes, hamstrings, and lower back while reducing stress on the spine. This makes it ideal for preventing lower back pain and improving athletic performance.
4. What are the best full-body gym machines for fat loss?
Machines like the sled push, battle ropes, and functional trainer (dual cable machine) engage multiple muscle groups, helping you burn more calories while building strength. These are excellent choices for HIIT workouts and fat loss training.
5. How can beginners use the assisted pull-up/dip machine effectively?
The assisted pull-up/dip machine is perfect for beginners working toward unassisted pull-ups and dips. Start with higher assistance and gradually reduce the weight support over time to build upper body strength.
Disclaimer
This post may contain affiliate links, which means we may earn a small commission if you purchase through our links. This comes at no extra cost to you and helps support the creation of more content like this. Thank you for your support!