10 Amazing Acro Yoga Poses for Beginners You’ll Love Trying

What Is Acro Yoga?

Acro yoga poses are a unique blend of yoga, acrobatics, and partner balancing a practice that doesn’t just test your flexibility, but also builds trust, communication, and connection between partners. Unlike traditional yoga, where the focus is often inward, acro yoga invites you to engage outward to fly, balance, and support someone else as they do the same for you.

Whether you’re a couple looking to deepen your bond or two friends trying something fun and fitness-oriented, acro yoga is a rewarding gateway to build strength, improve posture, and boost emotional connection. Many beginners start exploring yoga poses for 2 people because partner yoga builds trust and balance while keeping the practice playful.

But don’t let the stunning poses on Instagram intimidate you. Beginner-friendly acro yoga poses exist and they’re just as exhilarating. No, you don’t need to be a gymnast or circus performer. All you need is an open mind, a patient partner, and a willingness to play.

In this post, we’ll guide you through 10 beginner acro yoga poses complete with tips, safety notes, and benefits. These poses are ideal even if you’re new to yoga altogether.

Let’s fly!

Getting Started: Acro Yoga Basics

Before jumping into the poses, let’s clear up some key roles in acro yoga:

  • Base: The person on the ground, offering support.
  • Flyer: The person being lifted, balanced, or suspended.
  • Spotter: Optional but recommended someone watching to help prevent falls and guide posture.

Tip: Always warm up with some light partner yoga stretches. Communication is key. Make sure both partners understand each movement before attempting it. If you are completely new to yoga practice, it helps to first understand the fundamentals of posture, breathing, and alignment explained in this complete yoga guide for beginners.


1. Front Bird Pose (Base of Acro Yoga)

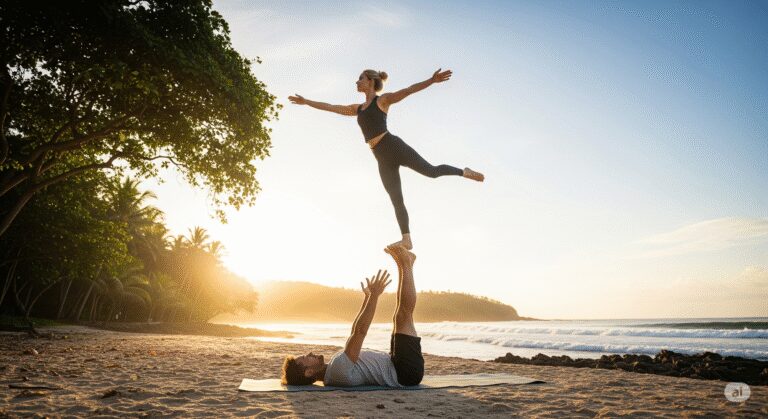
Also called “Superman pose” in acro yoga, the Front Bird is often the first pose beginners learn. It’s a foundational posture that teaches balance, alignment, and trust.

How to Do It:

  1. Base lies flat on their back with knees bent, feet raised.
  2. Flyer stands in front, facing the base, and places their hips on the base’s feet.
  3. Base straightens legs slowly while holding the flyer’s shoulders or hands.
  4. Flyer extends arms out (like Superman) and balances with a strong core.

Key Points:

  • Engage your core muscles to stay steady.
  • Communicate constantly: small shifts in weight matter.
  • Start with a spotter if you’re new.

Benefits:

  • Strengthens core and leg muscles (for both).
  • Improves posture and body awareness.
  • Builds trust and team coordination.

2. Throne Pose (Fun and Stable Acro Pose for Beginners)

The Throne Pose is playful and confidence-boosting the flyer gets to “sit” like royalty while the base provides a solid seat. It’s great for building comfort in acro yoga without much risk of falling.

How to Do It:

  1. Base lies on their back with knees bent and feet flat.
  2. The Flyer steps up onto the base’s feet one at a time.
  3. The base places their feet under the flyer’s buttocks, lifting them while holding their ankles.
  4. The flyer sits upright, placing their hands on the base’s knees for support.
  5. Both partners hold the posture, keeping the flyer’s core active.

Key Points:

  • Base’s legs should remain perpendicular to the floor.
  • The flyer must sit upright with spine tall, avoiding leaning backward.
  • Engage your glutes and thighs to help balance.

Benefits:

  • Strengthens leg and ankle stability for the base.
  • Improves posture and core control for the flyer.
  • Great confidence-builder for beginners.

Pro Tip: Smile and hold hands for photos it looks royal and makes for a perfect Instagram acro moment!


[Banner Ad Placement #2 “Try This Lightweight Travel-Friendly Acro Yoga Mat” (Insert banner)]


3. Back Bird Pose (The Flying Heart Opener)

Ready for a deeper trust fall? The Back Bird Pose flips the flyer over so they’re facing up creating a heart-opening, flying posture that’s incredibly therapeutic.

How to Do It:

  1. Base lies on the floor with legs up.
  2. The Flyer turns their back to the base and gently lowers their hips onto the base’s feet.
  3. As the base pushes upward, the flyer leans back, spreading arms open.
  4. Both partners adjust to find balance the flyer should open the chest and arch the back slightly.

Key Points:

  • The base must keep legs strong and feet flat against flyer’s sacrum (not lower back).
  • The flyer should engage core and avoid collapsing into the lower back.
  • Keep it gentle and slow it’s more about openness than height.

Benefits:

  • Stretches chest, shoulders, and spine.
  • Builds deep emotional trust (flyer has no visual control!).
  • Great for improving flexibility and counteracting desk posture.

Emotional Note: This pose feels symbolic you’re literally “letting go” and allowing someone else to support your heart. It’s a favorite in acro healing workshops.


4. Whale Pose (Gentle Therapeutic Stretch)

Whale Pose is a flying heart opener with a deep supported backbend. Ideal for couples or partners who want to include therapeutic elements in their acro yoga practice.

How to Do It:

  1. The Base lies down and places feet on the flyer’s shoulder blades (angled slightly downward).
  2. The Flyer stands facing away, leans backward, and places arms overhead (into the base’s hands).
  3. As the flyer bends back, the base lifts with the legs, slowly arching the flyer into a supported backbend.
  4. Hold position gently, ensuring neck and shoulders are not strained.

Key Points:

  • Base’s legs should provide slow, controlled lift.
  • Flyer’s arms can be outstretched or held behind back depending on comfort.
  • Use a yoga bolster or folded towel under base’s hips for extra support.

Benefits:

  • Deep chest and shoulder opening for the flyer.
  • Relieves tension in back and neck.
  • Therapeutic, calming, and ideal after long hours of sitting.

Healing Tip: Whale Pose is often used in partner yoga therapy sessions for emotional release and stress relief. You can even play soothing music in the background.


5. Flying Paschimottanasana (Flying Forward Fold)

Flying Paschi is the flying version of the seated forward fold an energizing stretch that deeply opens the hamstrings for the flyer and strengthens the base’s legs. It’s calm, quiet, and incredibly grounding.

How to Do It:

  1. Base lies down and lifts legs straight up at a 90° angle.
  2. Flyer stands facing the base, holding hands and leaning forward into a forward fold.
  3. The base places their feet on the flyer’s hip bones, then slowly lifts them while guiding the flyer’s hips upward.
  4. Once in position, the flyer releases hands and stretches forward, letting arms dangle or hold ankles.

Key Points:

  • The flyer should keep legs straight and core engaged.
  • The base must align feet properly to avoid tipping.
  • This is a passive pose focus on lengthening, not pulling.

Benefits:

  • Stretches hamstrings, calves, and spine for the flyer.
  • Enhances balance and coordination for both.
  • Calms the nervous system great for winding down.

Mind-Body Tip: Practice deep breathing together while holding this pose. It activates the parasympathetic nervous system and invites calm.


6. Shoulder Stand on Base (Supported Inversion)

This pose is slightly more advanced but still accessible for adventurous beginners. The flyer stacks vertically in a shoulder stand, fully supported by the base’s arms and legs making it a safer intro to inversions.

How to Do It:

  1. The Base lies on their back and places their feet on the flyer’s lower back or hips.
  2. Flyer begins in a plank or tuck position, then lifts legs upward into a straight line.
  3. The base uses hands to support flyer’s shoulders or upper back, creating a stable base.
  4. The flyer keeps core tight, legs straight, and chin tucked slightly.

Key Points:

  • Communication is crucial move slowly and deliberately.
  • The flyer should engage inner thighs and abs.
  • Start near a wall for safety if needed.

Benefits:

  • Safe and effective way to practice inversions.
  • Builds core strength, balance, and body awareness.
  • Encourages circulation and spinal alignment.

Balance Tip: This pose might feel intimidating at first, but once mastered, it’s incredibly empowering and opens the door to advanced acro inversions.


7. Folded Leaf Pose (Restorative Flow Pose)

The Folded Leaf Pose is a relaxing and therapeutic position the flyer hangs over the base’s legs in a passive forward bend. It’s often used between more intense poses to reset and reconnect.

How to Do It:

  1. Base lies down and lifts legs to 90°.
  2. The Flyer places hips on the base’s feet (as in Front Plank), then folds forward from the hips.
  3. Arms dangle loosely or rest beside the base’s shins.
  4. The base can hold the flyer’s shoulders or hips for added stability.

Key Points:

  • The flyer’s spine should be long and relaxed.
  • Keep breathing slow and steady.
  • Let gravity do the work don’t pull or resist.

Benefits:

  • Gently stretches spine, shoulders, and back.
  • Helps release emotional tension and anxiety.
  • Allows for deep connection and shared mindfulness.

Emotional Release Insight: Many people experience unexpected emotions in this pose due to its vulnerability and surrender. It’s a perfect acro move for healing-based yoga.

8. Star Pose (Side Star)

Star Pose is one of the most striking beginner-friendly poses in acro yoga. It builds serious strength and trust while making you look like a sky-bound superhero.

How to Do It:

  1. The base lies flat, legs at 90°, and places one foot on the flyer’s inner thigh, the other on the opposite hip.
  2. The flyer starts in a sideways plank position (side body down), leaning weight into the base’s feet.
  3. On a count, the base presses upward, lifting the flyer who opens into a side star shape one arm up, one down.
  4. Flyer keeps body strong, core and glutes activated, and arms extended in opposite directions.

Key Points:

  • Start low and slow. The base should adjust foot positions carefully.
  • Flyer must engage side-body muscles to hold line.
  • Keep eyes on each other for extra balance cues.

Benefits:

  • Boosts shoulder and side-body strength.
  • Improves communication and proprioception.
  • Makes a fun, impressive photo-worthy move.

Pro Tip: This one is Instagram gold. Choose a nature backdrop or sunset for your Star Pose practice!


9. Straddle Throne (Wide-Legged Seated Pose)

This is a playful, seated position perfect for selfies and fun the flyer sits upright on the base’s feet, legs in a wide straddle, making a classic “throne.”

How to Do It:

  1. The base lies on their back and lifts feet parallel, toes pointing up.
  2. The flyer steps onto the base’s feet and sits down carefully.
  3. Once secure, the flyer opens the legs into a straddle (V-shape), keeping arms extended or on hips.
  4. The base maintains firm feet under the flyer’s sit bones, supporting with hands if needed.

Key Points:

  • Flyer should keep spine tall and hips grounded.
  • Great for beginners to practice balance before transitioning to flows.
  • Use a spotter in early attempts.

Benefits:

  • Stretches inner thighs and hips.
  • Builds confidence in upright balancing.
  • Looks fun, friendly, and social.

Fun Variation: Try adding “namaste” hands or silly expressions. Straddle Throne is made for joy!


10. Super Yogi (Superman Flow Variant)

The Super Yogi is a variation of Front Plank with arms extended like Superman it challenges balance, strength, and playfulness all in one.

How to Do It:

  1. Start in basic Front Plank (flyer flying horizontally, base lying flat with legs up).
  2. Flyer extends arms forward, legs straight back, engaging core and glutes like flying!
  3. Base supports hips or thighs and makes minor foot adjustments to maintain lift.

Key Points:

  • Great core challenge for the flyer.
  • Base must stay grounded and keep toes active.
  • Arms stretched = more difficulty. Modify with bent elbows if needed.

Benefits:

  • Strengthens back, core, shoulders.
  • Teaches spatial awareness and control.
  • Perfect transition pose for flows and creative sequences.

Inspiration Tip: Name your pose! “Super Michael” or “Flying Serenity” give it personal meaning.


1. Partner Prep: Building Trust Before You Fly

Before you jump into flying poses, the most important foundation isn’t physical it’s emotional trust.

Acro yoga isn’t just about strength and balance. It’s about feeling safe enough to let go physically and mentally. So here’s how to prep with your partner:

1. Eye Contact is Everything

Before lifting off, spend a few seconds looking into each other’s eyes. This simple act sets a tone of presence and connection.

2. Establish Clear Signals

Have a system:

  • “Up” = ready to fly
  • “Down” = lower me now
  • Tap twice = discomfort or real pain

This helps prevent injury and builds confidence.

3. Do Trust-Building Warm-Ups

  • Try mirror yoga: Copy each other’s movements in sync.
  • Try lean-backs while holding hands feeling one another’s weight.

These practices prime your nervous system to relax into the connection, which is key for balance.

4. Respect Each Other’s Limits

Your partner may feel nervous or hesitant at first don’t push it. Instead, stay playful and positive. Progress in acro yoga comes faster with patience.

Healing Insight: If you’ve ever had trust issues or control struggles in relationships, acro yoga might bring those patterns up. Use that as a space for emotional growth and reflection.


2. Is Acro Yoga Safe for Beginners?

Yes but only if approached with care, communication, and support. Here’s your beginner safety checklist:

1. Always Warm Up First

Start with 10–15 minutes of dynamic stretches:

  • Cat-Cow
  • Downward Dog
  • Hamstring stretches
  • Hip openers (Lizard, Pigeon)

This prepares your joints and fascia for balancing movements.

2. Use a Spotter

In early attempts, always have a third person to assist especially for moves like Front Plank, Star Pose, or Throne.

A good spotter can prevent:

  • Twists and awkward landings
  • Slipping or panicking
  • Shoulder or lower back strain

3. Stay on Soft Surfaces

Practice over:

  • Yoga mats (double layer is better)
  • Grass
  • Padded flooring

Avoid hard tiles or concrete even for seated poses.

4. Breathe Together

If either of you holds your breath, it can signal tension. Practice synchronized breathing before and during the poses. It:

  • Improves timing
  • Helps relax the nervous system
  • Keeps the vibe calm

Emotional Note: Let your breath be the bridge. When one partner exhales, the other can match this creates a subtle yet powerful bond of presence.


3. What Should I Wear for Acro Yoga?

Beginner mistake? Wearing loose clothes that bunch up or slip.

Best Outfit Tips:

  • Tops: Fitted tank or sports tee (no zippers)
  • Bottoms: High-rise yoga leggings or fitted shorts
  • Avoid: Jewelry, baggy pants, lotions on hands/legs

If you’re the base, grip matters bare feet and dry skin give more control.

For flyers, choose lightweight clothing that won’t slide off the base’s feet or hands.

Pro Tip: Carry a small towel. Sweat can make gripping difficult especially during warm-ups or in humid areas.


4. Emotional Healing Through Acro Yoga

(A Hidden Power Nobody Talks About)

For many, acro yoga becomes more than just movement it’s a mirror for deep emotional patterns.

1. Letting Go of Control

As a flyer, you’re forced to release control and surrender to your partner’s support. This can bring up fear, resistance, or even childhood trauma related to trust and safety.

If you’ve ever felt “I can’t rely on anyone,” acro yoga can help rewrite that story slowly and safely.

2. Rebuilding Body Confidence

Many beginners (especially women) fear being “too heavy” to fly. But acro yoga teaches you:

  • Every body is liftable
  • Your weight is not a problem it’s just physics and leverage
  • You’re worthy of support, no matter your size or shape

As you feel yourself lifted and held, your nervous system registers a new experience of worthiness.

3. Repairing Relationship Wounds

Couples who practice together often notice:

  • Arguments reduce
  • Communication improves
  • They laugh more and fight less

That’s because play is healing. And acro yoga is deep play rooted in mutual care.

4. Soothing Anxiety Through Movement

The rhythmic flow of partner balancing calms the vagus nerve, which regulates your stress response.

Especially helpful for:

  • Anxiety-prone individuals
  • Overthinkers
  • People recovering from trauma or burnout

Healing Insight: Many yoga paths work with the mind. Acro yoga goes through the body to reach the heart.


5. Can I Practice Acro Yoga Alone?

Yes and you should. Solo practice helps build strength and flexibility for partnered poses.

Here are 3 great solo acro prep moves:

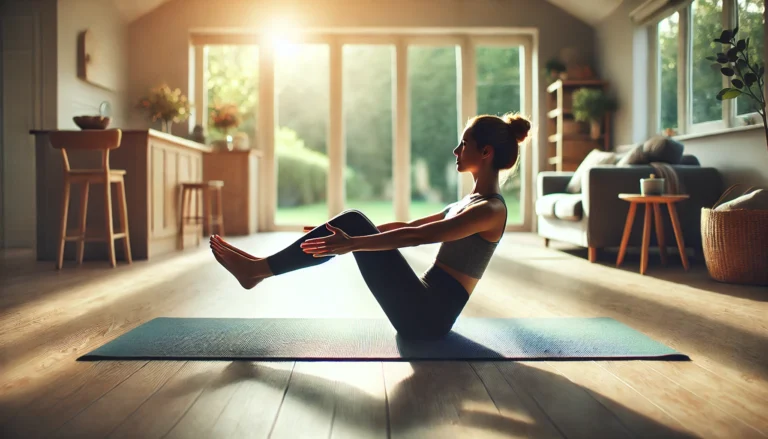
1. Boat Pose (Navasana)

Strengthens core and hip flexors.

  • Sit on your mat
  • Lift legs up and extend arms forward
  • Hold for 30–60 seconds

2. Wall L-Sits

Mimics the base’s leg position for flying poses.

  • Lie on your back
  • Place feet on wall at 90°
  • Engage thighs and press into the wall for 1 minute sets

3. Bridge Pose (Setu Bandhasana)

Opens the chest and hips vital for both roles.

Practicing these builds confidence, awareness, and readiness so you feel grounded even before a partner lifts you.


6. Ideal Playlist for Acro Yoga Flow

The right music transforms the practice from “exercise” to soulful connection.

Here’s a beginner-friendly acro yoga playlist vibe:

TrackArtistMood
“Weightless”Marconi UnionDeep calm
“Lotus Flower”Radiohead (instrumental)Floaty
“Breathe”TélépopmusikRhythmic flow
“Awake”TychoLight & dreamy
“Sun Will Set”Zoë KeatingEmotional release

Use low-BPM tracks without strong lyrics this keeps attention on the body and breath.

🎧 Spotify Tip: Search “Acro Yoga Flow” or “Partner Yoga Chill” for curated soundtracks.


7. Common Mistakes Beginners Make in Acro Yoga

Even though acro yoga looks playful and light, beginners often fall into a few traps. Sometimes those mistakes even turn into unexpectedly hilarious moments, which is why many people share their bloopers and balance fails while trying different funny yoga poses during practice. Knowing these in advance saves injury, embarrassment, and frustration.

1. Skipping the Warm-Up

You must warm up both your body and connection. Cold muscles and misaligned communication = the #1 cause of partner yoga injuries.

Fix: Do a 5–10 minute warm-up of sun salutations, hip openers, and joint mobility together.

2. Forcing the Pose

This isn’t gymnastics. Acro yoga isn’t about “nailing the move” it’s about being present and fluid.

Fix: Focus on small adjustments, breath sync, and finding the joy not perfection.

3. Poor Communication

Saying nothing mid-pose? That’s a recipe for disaster. Saying too much? Also a mess.

Fix: Use short, clear cues:

  • “Lower a bit”
  • “Engage core”
  • “Let’s come down”

4. Ignoring Spotting

Even seasoned duos can fall. Without a spotter, you risk head/neck injuries.

Fix: Always have a third person to guide, catch, or correct. Even in casual play.


8. How to Make Acro Yoga Part of Your Wellness Routine

You don’t need a full-blown class to enjoy the benefits of partner yoga. Just a 15–30 minute weekly flow can uplift your mood, muscles, and mindset.

Weekly Acro Flow Plan (for Beginners)

DayActivity
MondaySolo strength training (core + legs)
WednesdayPractice 2–3 beginner poses (Bird, Throne) with a partner
FridayFlow + stretch + cool-down
SundayWatch tutorials, journal on connection/trust progress

Pro Tip: Record your flows weekly you’ll notice confidence and trust visibly grow.


Best Gear for Acro Yoga at Home

You don’t need much, but these tools elevate the experience:

  • Thick yoga mat (≥6mm) – Prevent wrist and hip bruising
  • Yoga blocks – Great for support when learning base roles
  • Knee sleeves or cushions – Especially useful for flyers practicing sits or backbends
  • Essential oils (e.g., lavender or peppermint) – Calm nerves and improve focus

FAQ

1. Is acro yoga safe for beginners?

Yes, when practiced with communication, consent, and a spotter, acro yoga is beginner-friendly and low-risk. Start with foundational poses and don’t push beyond comfort.

2. Can I do acro yoga without a partner?

You can train solo to improve core strength, flexibility, and balance. But true acro yoga requires a partner. Apps, local studios, or online communities can help you connect with others.

3. What if I’m not flexible or strong enough?

That’s totally okay. Many beginners think acro yoga needs elite fitness but it’s more about technique, breath, and trust than brute strength or bendiness.

4. How often should I practice acro yoga?

2–3 times per week is ideal for beginners. Focus on quality over quantity, ensuring each session includes warm-ups, 2–3 poses, cooldown, and open conversation.

5. What’s the difference between acro yoga and regular yoga?

Acro yoga combines yoga, acrobatics, and Thai massage, while regular yoga is a solo mat practice. Acro adds a layer of connection, balance, and trust-building that’s unique.


Disclaimer:

Important: The content on this page is for informational and educational purposes only. Acro Yoga involves physical movement that may pose a risk of injury if not performed correctly. Always consult your physician before starting any new fitness activity. Practice with a trained partner and under the guidance of a certified yoga instructor.

Affiliate Disclosure: This post may contain affiliate links. This means we may earn a small commission at no extra cost to you if you make a purchase through our links. We only recommend products, retreats, or training programs we genuinely believe in. Your support helps keep ThriveInSerenity.com running and focused on sharing healing tools with the world.

7 Fun Yoga Poses for 2 People That Build Trust & Connection

Yoga poses for 2 people are more than just playful stretches they’re an opportunity to deepen trust, communication, and emotional connection. Whether you’re practicing with a partner, friend, or even a child, these partner yoga poses help you sync your breath, share your balance, and strengthen your bond both physically and spiritually. In this post, we’ll explore 7 fun, beginner-friendly yoga poses designed to create laughter, release tension, and bring two hearts closer, one breath at a time. Whether you’re looking for couples yoga to reignite intimacy or simply want to try acro yoga for fun, this guide will inspire connection on the mat and beyond.

The Magic of Yoga for Two

Yoga is often practiced solo a deeply personal ritual of breath, awareness, and movement. If you’re new to the practice and want to understand the fundamentals before trying partner movements, exploring a complete yoga guide can help you build a safe and mindful foundation. But there’s a lesser-known side to this ancient practice that can be just as powerful: yoga poses for 2 people.

Whether it’s with your partner, a close friend, or even your child, partner yoga opens up an entirely new layer of emotional and physical connection. It transforms yoga from a personal journey into a shared exploration of trust, communication, and presence.

Here’s why it matters:

  • Trust and Vulnerability: Partner poses often require one person to support the other, both physically and emotionally.
  • Deep Listening: You must listen not only to your own body, but also to your partner’s breath, energy, and comfort level.
  • Playfulness and Fun: Laughter is guaranteed. Some poses may be awkward at first but that shared discomfort often turns into connection.
  • Emotional Intimacy: Moving in sync fosters a subtle yet powerful emotional bonding, especially for couples or close friends.

Imagine starting your morning with a shared breathing ritual that grounds you both. Or ending the day with a supported backbend that melts away tension while your partner holds space for your release.

In this blog, we’ll walk you through 7 carefully chosen yoga poses for 2 people that are suitable for beginners and deeply rewarding for the soul. These aren’t acrobatic circus acts they’re accessible, beautiful, and designed to build real-life trust and emotional alignment.

Whether you’re a couple looking to rekindle connection, or two friends seeking a unique bonding activity, this guide is your blueprint.


What You’ll Discover:

  • Beginner-friendly partner poses (no experience needed)
  • Emotional and physical benefits of yoga for two
  • Safety tips and communication guidelines
  • Beautiful rituals for building trust and intimacy
  • Bonus: 5 FAQs about couples yoga and acro yoga

Let’s begin this journey of connection one mindful pose at a time.

Understanding Partner Yoga, Acro Yoga & Couples Yoga

Before jumping into the poses, it’s important to understand the different forms of yoga with two people. Many beginners wonder: What’s the difference between partner yoga, acro yoga, and couples yoga? Let’s break it down so you know exactly what you’re practicing.

What Is Partner Yoga?

Partner yoga is a style where two individuals work together to deepen stretches, improve balance, and support each other physically and emotionally.

It’s not about being perfectly flexible or acrobatic the focus is on:

  • Communication
  • Cooperation
  • Mindful touch
  • Mutual support

Some poses involve synchronized breathing while sitting back-to-back. Others involve one person assisting another into a deeper stretch.

🔹 Think of partner yoga as a gentle invitation to explore how two bodies can create harmony through movement.


What Is Acro Yoga?

Acro yoga combines:

  • Yoga
  • Acrobatics
  • Thai massage elements

It typically involves two roles:

  • The base (lying or standing)
  • The flyer (lifted off the ground)

If you’re curious about trying beginner-friendly lifts and balance techniques, exploring different acro yoga poses can help you safely progress into more dynamic partner practice. You might see poses where one partner balances the other on their feet or hands in the air.

While some acro poses require strength and skill, many beginner-friendly ones are surprisingly accessible with proper communication and safety. We’ll include one fun acro-inspired pose in this guide!

Benefits of Acro Yoga:

  • Builds deep trust and teamwork
  • Enhances body awareness and balance
  • Requires complete presence and communication

What Is Couples Yoga?

Couples yoga is essentially partner yoga with emotional intimacy at the forefront. While the poses can be similar to any partner yoga sequence, the intention shifts more toward:

  • Emotional bonding
  • Relationship healing
  • Non-verbal communication
  • Mindful touch and affection

You don’t need to be in a romantic relationship to enjoy this but when done with a partner or spouse, it can become a beautiful tool for:

  • Rebuilding connection
  • Deepening empathy
  • Creating sacred time together

Summary: Key Differences

TypeFocusSuitable ForTypical Poses
Partner YogaSupport, flexibility, balanceFriends, family, couplesBack-to-back poses, assisted folds
Acro YogaStrength, balance, trustConfident beginners upLifts, flying poses, dynamic holds
Couples YogaEmotional connection, bondingRomantic partnersHeart openers, eye-gazing, tandem breath

Who Can Try Yoga for Two?

Absolutely anyone. These practices are:

  • Gender-neutral
  • Age-inclusive
  • Perfect for beginners

All you need is a willing partner, a soft surface, and an open mind.

Tip: If you’re shy or nervous, start with simple back-to-back seated breathing (explained in Pose 1) to ease into the experience.

Before You Begin – Safety, Setup & Mindset

Now that you understand what partner yoga and acro yoga are, it’s time to prepare your space and your energy. While yoga poses for 2 people can be playful and lighthearted, they also require mutual respect, mindfulness, and communication.

Here’s how to create the perfect setup for a successful session.

1. Choose the Right Space

Find a calm, open area that allows you both to stretch without bumping into furniture or distractions.

Recommended:

  • Soft carpeted floors or yoga mats
  • Outdoor settings (parks, beach, terrace)
  • Quiet rooms with minimal noise

Turn off notifications your phone can wait.

Optional Upgrade: Add ambiance with aromatherapy oils, a salt lamp, or calming music.

2. Wear the Right Clothing

Comfort is key and so is flexibility.

What to wear:

  • Breathable yoga pants or leggings
  • Fitted tops (to avoid sliding during poses)
  • Avoid jewelry, belts, or zippers

Both partners should feel confident and able to move freely.

3. Warm Up Together

Don’t dive directly into deep poses warm up with individual stretches first, then sync up with light partner movements.

Suggested warm-up sequence:

  • Neck rolls
  • Shoulder circles
  • Cat-cow poses (do side-by-side or facing each other)
  • Seated twist
  • Wrist circles

Finish the warm-up by sitting back-to-back, taking 5 deep breaths in unison inhaling peace, exhaling tension.

4. Set a Shared Intention

Before you begin the poses, pause and ask each other:

“What do we want to feel or create in this session?”

Some intentions might include:

  • Connection
  • Playfulness
  • Healing
  • Mindfulness
  • Trust

Speaking your intention aloud creates shared awareness and emotional grounding.

5. Understand the Safety Rules

Even beginner-friendly partner poses involve shared weight and balance so safety is essential.

Golden Rules:

  • Communicate before, during, and after each pose
  • Check in often: “How does this feel?” / “Okay if I lean more?”
  • Never pull or yank a partner into a stretch
  • Stop immediately if there’s discomfort or instability
  • Support each other when coming in/out of poses

Never force a stretch. Every body has its own edge honor that.

6. Establish Physical Cues

Sometimes words aren’t enough physical cues help partners stay in sync.

  • A light squeeze of the hand = “Let’s pause here”
  • A gentle tap = “I’m ready to go deeper”
  • A soft pull = “Please help guide me back up”

These cues become especially important in balancing or inversion poses.

7. Let Go of Performance

This isn’t a competition. It’s not about doing the pose “perfectly.” It’s about:

  • Laughing when you fall
  • Feeling into the connection
  • Staying present together

The yoga happens not in the pose but in the moment shared between the pose.

Trust-building tools, partner yoga video course, or eco-friendly yoga props

Pose 1 to Pose 7 – Starting with Grounding & Connection

Now that you’re physically and mentally prepared, it’s time to dive into the actual poses. These first three are gentle, grounding, and perfect for beginners. They’re designed to help you tune into each other’s breath, posture, and energy while easing into physical support and trust.

1. Seated Back-to-Back Breathing

Best for: Emotional synchronization, calming nerves, beginner partner practice
Type: Grounded / Meditative / Breath Awareness

How to do it:

  1. Sit cross-legged, back-to-back with your partner.
  2. Feel each other’s spine. Try to align your posture evenly.
  3. Close your eyes. Rest your hands on your knees or thighs.
  4. Begin by simply observing your own breath.
  5. After a few rounds, try to sync your inhale and exhale with your partner’s.
  6. Breathe together for 2–5 minutes.

Emotional Benefits:

  • Creates a calm, shared rhythm
  • Fosters non-verbal trust
  • Begins the yoga bonding process in stillness

Tip: Use a calming mantra like “I trust. I support.” silently as you breathe.


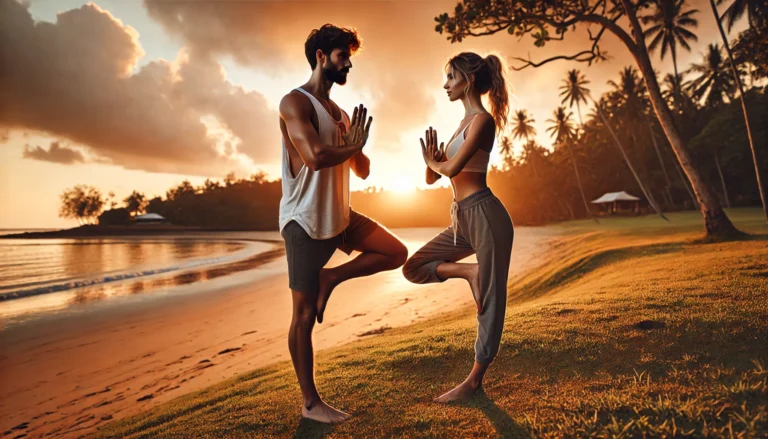
2. Double Tree Pose

Best for: Balance, light challenge, playfulness
Type: Standing / Balancing / Teamwork

How to do it:

  1. Stand side by side, shoulders touching slightly.
  2. Each person lifts their inner leg and places the sole of the foot against their standing thigh or calf (not the knee).
  3. Bring your palms together in front of you or raise your outer arms overhead.
  4. Engage your core, look straight ahead, and balance for 5–10 breaths.

Emotional Benefits:

  • Develops mutual grounding
  • Enhances trust in physical and energetic alignment
  • Encourages shared focus and laughter

Challenge version: Try closing your eyes for a few seconds together. Expect giggles!


3. Seated Forward Fold Pull

Best for: Hamstring stretch, back release, shared flexibility
Type: Seated / Stretching / Trust & Resistance

How to do it:

  1. Sit facing each other, legs extended and wide in a V shape.
  2. Press your feet sole-to-sole (or rest gently against each other’s ankles).
  3. Hold hands firmly.
  4. One partner leans back slightly while gently pulling the other partner into a forward fold.
  5. Stay for 5 breaths, then switch roles.

Emotional Benefits:

  • Builds trust through physical resistance
  • Teaches active listening through body language
  • Deepens flexibility while being supported

Tip: Communicate your limits clearly say “stop” or “a bit deeper” based on how your body feels.

Strength, Lifts, and Playful Acro Trust Builders

The next two poses introduce light acro yoga elements and muscle engagement. Don’t worry you don’t need circus skills. These poses are fully beginner-friendly and designed to build trust, balance, and communication while adding a touch of playful challenge.


4. Double Downward Dog (Partner Pyramid)

Best for: Shoulder strength, trust, alignment
Type: Inversion / Stretch / Light Acro

How to do it:

  1. Partner A starts in traditional downward dog: hands and feet on the mat, hips lifted in an inverted V.
  2. Partner B stands behind and places their hands a few feet in front of Partner A’s.
  3. Partner B places their feet gently on Partner A’s lower back or hips (NOT spine).
  4. Adjust the balance and hold for 3–5 breaths.

Make sure:

  • Partner A feels strong and stable.
  • Partner B doesn’t dump too much weight.
  • Communicate: “Are you okay?” or “Need to come down?”

Emotional Benefits:

  • Requires complete verbal coordination
  • Builds body awareness and mutual trust
  • Fun & rewarding when executed together

Bonus variation: Partner B can gently sway their hips for a shared movement rhythm.


5. Partner Boat Pose (Navasana)

Best for: Core strength, balance, eye contact, fun
Type: Seated / Balance / Core

How to do it:

  1. Sit facing each other with knees bent and toes touching.
  2. Hold hands outside your legs.
  3. Press the soles of your feet together and lift both legs to form a “V” with your bodies.
  4. Engage your core to maintain balance.
  5. Hold for 5–10 breaths and smile at each other!

You can also rock gently back and forth or try singing the alphabet to make it more playful.

Emotional Benefits:

  • Activates playfulness and laughter
  • Engages deep eye contact and coordination
  • Strengthens core connection physically and emotionally

Challenge variation: Try letting go of one hand and reaching up with the other. Then switch.


Core yoga tools, partner strength accessories, resistance bands

The Heart-Opening Camel for Vulnerability & Love

As we move into deeper emotional territory, this next pose is perfect for releasing tension, opening your heart space, and encouraging emotional intimacy.

Whether you’re close friends or romantic partners, this is a gentle yet powerful way to feel emotionally supported.

6. Twin Camel Pose (Back-to-Back Heart Opener)

Best for: Heart opening, emotional vulnerability, posture support
Type: Kneeling / Backbend / Emotional Release

How to do it:

  1. Both partners kneel back-to-back, knees hip-width apart, toes flat or tucked under for support.
  2. Gently reach behind and interlock arms or hold each other’s wrists or forearms.
  3. Slowly arch your backs together leaning into the stretch while supporting each other’s weight.
  4. Let your heads gently tilt back, eyes closed.
  5. Breathe deeply into the chest and belly, holding for 4–6 breaths.

What to focus on:

  • Don’t force the backbend use your partner’s support as a guide, not a crutch.
  • If one partner is more flexible, they can help stabilize the other with gentler support.
  • Let go of tension especially in your jaw, shoulders, and neck.

Emotional Benefits:

  • Deepens trust by opening your most vulnerable physical area the heart.
  • Encourages emotional letting go while being held and supported.
  • Releases blocked emotions (tears are welcome and normal).
  • Fosters a sense of non-verbal intimacy and presence.

Optional Ritual:

After coming out of the pose, remain kneeling and place your hands on your heart. Take a breath and say aloud:

“Thank you for supporting me. I see you. I feel you. I’m here.”

This moment of spoken presence can be incredibly healing especially for couples or those healing emotional wounds.

Safety Tip:

If either of you has lower back pain, go slow and keep the arch minimal. Use folded blankets under your knees for comfort.

Energy Focus: Heart Chakra

This pose is deeply connected to Anahata (heart chakra) the center of compassion, love, and forgiveness. Practicing it with someone you trust can help dissolve walls and improve emotional clarity.

Optional Add-On Tools:

  • Rose quartz crystal between your palms
  • Heart chakra essential oils (e.g., rose, geranium, or jasmine)
  • Soft healing music (e.g., Tibetan bowls or heart mantras)

7. The Trust Fall Stretch (Assisted Standing Forward Fold)

This final pose is a symbolic and physical expression of surrender and support. Often called the “trust fall yoga pose,” it combines a deep forward fold with full reliance on your partner’s strength and care.

It’s a beautiful way to end your partner yoga session, anchoring you both in mutual respect, safety, and emotional release.

Assisted Standing Forward Fold (Trust Fall Stretch)

Best for: Releasing tension, building surrender, restoring trust
Type: Standing / Assisted / Therapeutic

How to do it:

  1. Partner A stands upright in Tadasana (Mountain Pose).
  2. Partner B stands in front, back facing Partner A.
  3. Partner B gently folds forward, relaxing their upper body down like a rag doll.
  4. Partner A reaches under B’s arms and holds their wrists, forearms, or upper arms securely.
  5. Once stable, Partner A lifts gently upward to allow Partner B’s upper body to hang freely.
  6. Stay here for 5–10 breaths, then gently guide B back up, and switch roles.

Key Tips for Safety:

  • The base (Partner A) should engage their core and avoid leaning backward.
  • Make sure Partner B relaxes fully but communicates if there’s discomfort or lightheadedness.
  • The lift should be gentle, not yanking the goal is support, not traction.

Emotional Benefits:

  • Encourages emotional surrender in a supported environment.
  • Builds non-verbal emotional trust especially for those healing from betrayal or anxiety.
  • Physically decompresses the spine, neck, and shoulders.
  • Serves as a symbolic letting go of past heaviness with someone literally “having your back.”

Ritual Add-On:

As Partner B relaxes into the stretch, Partner A can whisper a soft affirmation, like:

“You’re safe. I’ve got you.”
“You don’t have to carry it all alone.”
“Let go. I’m here.”

This turns the pose into a mini healing session for both people.

Final Tip:

This pose can be especially helpful for people who:

  • Struggle to ask for support
  • Feel uncomfortable being vulnerable
  • Are working on rebuilding relationship trust

If tears come up let them. That’s yoga doing its deeper work.

Guided yoga healing tracks, essential oils for relaxation, or trauma-informed yoga resources

Closing the Practice with Intention

After exploring these 7 fun yoga poses for 2 people, it’s essential to ground the energy and seal the experience.

Here’s a simple yet powerful closing ritual:


Seated Eye Gazing + Gratitude Sharing (2–3 minutes)

  1. Sit cross-legged, facing each other.
  2. Close your eyes. Take 3–5 deep breaths together.
  3. Open your eyes and gaze gently into each other’s (no need to force it).
  4. One by one, say one thing you appreciate about the other person in this session.

Examples:

  • “I felt really supported when you held my hips during the plank pose.”
  • “I love how safe I feel around you.”

This part turns your yoga into a soul-deep bonding practice not just physical alignment.


Bonus Tips for Maximum Connection

  1. Set the mood: Use calming music, dim lighting, and even aromatherapy oils.
  2. Turn off phones: This is sacred time be fully present.
  3. Breathe together intentionally: Sync your breath during each pose.
  4. Touch consciously: Every grip, press, or hold can be a form of silent care.
  5. Laugh freely: partner practice can sometimes turn into hilarious moments, especially when trying playful funny yoga poses together.

Call to Action (CTA)

Ready to build deeper bonds, more flexibility, and trust in your relationships all while having fun? To deepen your journey, don’t miss our complete guide on the best yoga poses for every body type and goal it’s packed with tips, visuals, and beginner-friendly routines to help you thrive.

Whether you’re in a romantic relationship, friendship, or parent-child duo, partner yoga brings play, presence, and healing into your connection.


FAQs

1. What are the best yoga poses for 2 people who are beginners?

Start with simple poses like Seated Spinal Twist, Partner Breathing, and Double Child’s Pose. These require minimal flexibility and focus on trust and balance.
Tip: Always communicate clearly and prioritize comfort.

2. Is couples yoga the same as acro yoga?

Not exactly. Couples yoga focuses more on emotional bonding and flexibility, while acro yoga involves acrobatics, strength, and balance with one partner often lifting the other.
Acro yoga is a sub-type of partner yoga but more physically demanding.

3. Can two people do yoga every day?

Absolutely! Daily partner yoga can:
Deepen your emotional connection
Build physical strength and flexibility
Help couples manage stress and arguments better
Start slow and adjust intensity based on energy levels.

4. What should I wear for partner yoga?

Wear breathable, stretchy yoga clothes. Avoid anything slippery or too loose. You’ll be in close contact comfort and modesty both matter.
Fitted tank tops and yoga leggings work great for both partners.

5. Is partner yoga only for romantic couples?

Not at all! Partner yoga can be practiced between:
Friends
Siblings
Parents and kids
Therapy partners
Any relationship can benefit from trust-based, mindful movement.


Final Thoughts

Partner yoga isn’t just about the poses it’s about the connection between the people in them. Whether you’re giggling through a balancing pose or releasing tears in a stretch, it’s all valid and valuable.


Disclaimer

This blog post is for informational purposes only and does not constitute medical advice. Always consult a qualified healthcare provider before starting any supplement or treatment. This article may contain affiliate links, which means we may earn a small commission (at no extra cost to you) if you make a purchase. We only recommend products we personally trust.

Boat Pose in Yoga: 5 Incredible Core Strengthening Results

1. Why Boat Pose Deserves Your Attention

Boat pose in yoga or Navasana is one of the most deceptively simple yet powerful postures in modern yoga practice. At first glance, it may seem like a basic balance move that targets the abs. But when practiced correctly and consistently, this pose becomes a full-spectrum training tool for both the body and the mind.

Unlike traditional abdominal workouts that isolate muscle groups, boat pose activates multiple layers of the core, strengthens posture-supporting muscles, enhances balance, improves breath control, and promotes emotional discipline. It doesn’t just sculpt a yoga body it builds real-life strength that carries over into how you move, breathe, and feel every day.

For anyone looking to deepen their yoga journey or simply find a reliable, effective core practice, Navasana is a must. If you are just starting your practice, it helps to understand the fundamentals of posture, breathing, and alignment explained in this complete yoga guide for beginners. Below, we’ll explore five of the most incredible benefits that make boat pose in yoga a transformational addition to your routine.


“Start your journey with a premium yoga mat designed for support and stability. Explore top-rated gear now.”


2. Activates Deep Core Muscles, Not Just Surface Abs

Most fitness routines focus on building visible abdominal muscles the six-pack look. But true core strength lies deeper. Boat pose in yoga engages the transverse abdominis, internal obliques, psoas, and pelvic floor muscles that are essential for long-term spinal stability, posture, and injury prevention.

In Navasana, your legs lift off the floor while your torso leans back slightly, forcing your core to stabilize your entire trunk. Because you’re holding a static position against gravity, all of your deep abdominal muscles must fire continuously. This builds functional strength, the kind you use when getting out of bed, lifting groceries, or holding good posture all day.

What makes this pose unique is that it builds this strength without the harsh spinal compression that comes from crunches or sit-ups. Instead, it aligns the spine, protects the lower back, and trains your core to work smarter, not harder.

Real-world result: Practitioners often report stronger lower backs, improved digestion (due to abdominal organ stimulation), and a tighter waistline. Many people even include Navasana in routines designed specifically for yoga for digestion because the pose gently massages the abdominal organs.

“Looking to accelerate core results? Try our best-selling natural core support formula designed to fuel your yoga workouts.”


3. Improves Balance and Neuromuscular Coordination

Holding boat pose requires more than physical strength. It also tests and develops your balance, body awareness, and coordination between your muscles and nervous system.

To stay lifted and aligned in Navasana, your brain and body must work together. Even the tiniest adjustments in your breath or gaze can cause wobbling. That instability is exactly what builds your neuromuscular intelligence the ability to control your body in space. Over time, this directly translates to better posture, improved athletic performance, and enhanced everyday movements.

This benefit is especially important for:

  • Older adults working on fall prevention
  • Athletes who need core-to-limb coordination
  • Desk workers struggling with stability and posture

By practicing Navasana regularly, your body learns how to stay balanced under pressure both physically and mentally.

Pro tip: Even if you tremble or wobble, that’s your body learning. The shake is part of the growth.

“Improve your balance and mental clarity with this blend of herbal focus enhancers. Trusted by yoga teachers and therapists.”


4. Builds Muscular Endurance Across the Entire Body

Many people are surprised to learn that boat pose in yoga is a full-body workout not just for the abs. When performed with good form, this posture recruits nearly every major muscle group.

In addition to your core, Navasana also engages:

  • Hip flexors (psoas and iliacus)
  • Quadriceps (to keep legs lifted)
  • Spinal erectors (to keep back straight)
  • Shoulders and arms (when extended forward)

The longer you hold the pose, the more these muscles must resist gravity. Unlike quick reps, isometric holds like this develop muscle endurance, which is vital for stamina in everything from walking and climbing stairs to playing sports or parenting toddlers.

Many yoga teachers recommend holding the pose for 30–60 seconds per round, with 2–3 rounds per session. As you progress, you can incorporate dynamic boat pose flows such as transitioning into half-boat or adding twists.

The result: Lean muscle tone, increased physical confidence, and the ability to hold your body in tension without fatigue.

“Struggling to hold boat pose longer? These resistance bands and yoga props are designed to help you build endurance safely.”


5. Supports Postural Alignment and Spinal Health

Modern life is brutal on posture. Hours of sitting and slouching cause our spines to round, our shoulders to collapse, and our hips to tighten. Over time, this leads to lower back pain, poor circulation, and even respiratory problems.

Boat pose in yoga counteracts these effects by teaching your body to lengthen and align itself naturally. By lifting the chest and engaging the deep core, you’re training your spine to stay upright without straining. The psoas muscle, which often becomes tight from sitting, is strengthened and lengthened in this pose, improving pelvic stability.

This benefit makes Navasana an ideal pose for anyone suffering from:

  • Lower back tightness
  • Anterior pelvic tilt
  • Forward head posture
  • Shallow breathing habits

Even two minutes of daily boat pose can begin to retrain your spine to support itself again without discomfort or effort.


6. Builds Mental Focus and Emotional Discipline

The benefits of boat pose in yoga go far beyond the physical. Holding this pose challenges your breath, your mind, and your ability to stay calm while under tension.

Navasana invites discomfort. Your legs shake, your abs burn, and your mind wants to quit. But each time you stay, breathe, and focus you’re building mental resilience and emotional self-control.

Yoga philosophy calls this inner fire “tapas.” It’s the discipline to endure difficulty without reacting impulsively. That discipline is what transforms a pose into a practice, and a practice into a lifestyle. Many teachers recommend combining Navasana with other best yoga poses to create a balanced routine that builds strength, flexibility, and mental focus.

Boat pose becomes a mirror: how you respond to it often reflects how you respond to pressure in daily life. With regular practice, people report:

  • More clarity in decision-making
  • Reduced anxiety or stress
  • Greater confidence in their bodies
  • Improved sleep quality

7. How to Do Boat Pose Safely and Effectively

Step-by-step:

  1. Sit on your mat with legs extended.
  2. Place hands behind you and lean back slightly.
  3. Bend knees and lift feet off the floor.
  4. Balance on your sit bones with spine straight.
  5. Extend arms parallel to the floor.
  6. Straighten legs slowly to form a V shape (if possible).
  7. Engage your core and breathe steadily.
  8. Hold for 5–10 breaths and repeat up to 3 rounds.

Modifications for Beginners:

  • Keep knees bent
  • Hold behind thighs
  • Sit on a folded blanket for hip support
  • Use a yoga strap around feet for stability

Advanced Variations:

  • Half-Boat (lower torso halfway)
  • Twisting Boat (rotate side to side)
  • Boat-to-Crow Flow (for advanced practitioners)

Common Mistakes to Avoid:

  • Rounding the back
  • Holding the breath
  • Using momentum instead of core strength
  • Tensing the shoulders and jaw

8. Add Boat Pose to Your Weekly Practice

To get results from boat pose in yoga, consistency matters more than intensity. Add it to your yoga or home fitness schedule like this:

Suggested Weekly Routine:

  • Monday: 3 rounds of boat + bridge pose
  • Wednesday: Boat to plank transitions
  • Friday: Dynamic boat lifts + twists
  • Saturday: Gentle flow with supported boat
  • Sunday: Full core series including boat, side plank, and cat/cow

Best time: Morning (before coffee), or post-cardio for core finishers
Recommended props: Mat, yoga block, leggings, breath support tea, app for tracking reps


FAQ

1. What is boat pose in yoga good for?

Boat pose strengthens your deep core, improves balance, enhances posture, supports spinal health, and builds mental resilience through breath control.

2. Is Navasana good for beginners?

Yes. Beginners can bend knees or hold thighs for support. With regular practice, strength and flexibility will increase over time.

3. Can boat pose help with weight loss?

While not a cardio movement, Navasana builds lean muscle, improves metabolism, and complements fat-loss routines when practiced consistently.

4. How long should I hold boat pose?

Start with 15–30 seconds. Over time, increase to 60 seconds or more, doing 2–3 rounds. Quality is more important than duration.

5. What should I avoid while doing boat pose?

Avoid rounding your back, collapsing your chest, or holding your breath. Engage the core and keep the spine long throughout the hold.

Learn more transformative poses in our Best Yoga Poses guide.


Conclusion

If you’re looking for a single yoga pose that delivers maximum value in minimal time, boat pose in yoga is it. It transforms your physical core, sharpens your mental focus, and teaches your body how to hold itself with strength and grace.

Make Navasana a daily habit and over time, you’ll build not just abs, but an unshakeable foundation in life.


Disclaimer

This blog post is for informational purposes only and does not constitute medical advice. Always consult a qualified healthcare provider before starting any supplement or treatment. This article may contain affiliate links, which means we may earn a small commission (at no extra cost to you) if you make a purchase. We only recommend products we personally trust.

25+ Best Yoga Poses for Every Mood, Body Type & Goal

Looking for the best yoga poses that truly match your mood, body type, or wellness goal? This guide covers 25+ handpicked postures perfect for stress relief, flexibility, weight loss, or inner peace. Whether you’re a beginner or experienced, find the ideal pose that fits your journey today.

Why One-Size Yoga Doesn’t Fit All

If you’ve ever rolled out your yoga mat hoping for instant peace or the perfect stretch but ended up bored, confused, or even discouraged you’re not alone. Yoga isn’t meant to be one-size-fits-all. Just like our moods, energy levels, and bodies change from day to day, so should our yoga practice. If you are new to the practice, it helps to understand the foundations of posture, breathing, and alignment explained in this complete yoga guide for beginners before exploring different yoga styles and poses. Whether you’re seeking deep healing, a laugh with friends, relief from pain, or a serious sweat session, the beauty of yoga lies in its diversity.

The modern yoga world is bursting with creative variations from goofy couple poses that spark joy, to soothing bedtime flows that melt away stress. You no longer need to force yourself into rigid routines or complicated asanas that feel disconnected from your real-life needs. In fact, finding the right type of yoga for your specific goal be it digestion, back pain, weight loss, or emotional balance can be a total game-changer.

This guide is your gateway to 25+ handpicked yoga poses and styles that serve every mood, body type, and lifestyle. We’ll explore everything from traditional solo poses like Eagle Pose and Boat Pose, to popular themes like Yoga with Adriene for Sleep, to community favorites like Acro Yoga for Beginners and Funny 2-Person Yoga Challenges. Each section includes image suggestions, emotional benefits, and clear internal links to explore each pose in more detail.

By the time you finish reading, you’ll have a personalized toolkit of yoga practices that truly meet you where you are physically, emotionally, and even socially. Whether you’re curled up with cramps, struggling with digestion, or just want a shared laugh with your best friend, there’s a pose here for you.

So, unroll your mat (or your favorite blanket), take a deep breath, and get ready to explore a vibrant mix of yoga that goes far beyond sun salutations and silent meditation. From the silly to the sacred, this is yoga for real life.

Ready to jump in? Start with our first category: Fun & Partner Yoga Poses You’ll Love Sharing.

Healing Yoga Poses for Digestion, Period Cramps & Deep Sleep

While yoga is often praised for improving flexibility or strengthening the core, some of its most powerful benefits are internal helping you regulate digestion, calm the nervous system, ease menstrual cramps, and gently detoxify the body. These healing poses may not go viral on social media, but they transform lives in quiet, lasting ways.

The best part? You don’t need fancy gear or deep knowledge of anatomy. Just a few mindful movements and intentional breathing can help your body return to balance. Below are four healing sequences tailored for common concerns most of us experience bloating, sleepless nights, monthly cramps, and sluggish digestion.


1. Yoga for Digestion: 6 Effective Poses to Ease Bloating Fast

Bloating and digestive discomfort often stem from poor posture, stress, or slow-moving guts. Yoga gently massages your internal organs, boosts circulation, and stimulates the parasympathetic nervous system (aka “rest and digest” mode).

This sequence includes:

  • Supine Twist for colon stimulation
  • Wind-Relieving Pose (Pawanmuktasana) the name says it all!
  • Cat-Cow to gently compress and release the abdomen
  • Seated Forward Fold for deep gut compression
  • Bridge Pose to open the hip flexors
  • Knees to Chest (Apanasana) to help expel trapped gas

Read full blog: Yoga for Digestion – 6 Poses to Ease Bloating Fast

Link calming herbal teas (peppermint, ginger) or acupressure mats for gut relief.


2. 8 Calming Bedtime Yoga Poses That Promote Deep Sleep

If your mind races the moment your head hits the pillow, you’re not alone. Insomnia and restlessness often stem from an overactive nervous system. Bedtime yoga offers a sanctuary from stimulation inviting your breath to slow, muscles to soften, and thoughts to release.

This gentle sequence includes:

  • Child’s Pose to soothe the brain and nervous system
  • Legs-Up-the-Wall Pose to reduce anxiety and fatigue
  • Reclined Butterfly to open the hips while lying down
  • Seated Forward Bend for grounding energy
  • Supine Spinal Twist to unlock the spine
  • Savasana with Body Scan Meditation

Read full blog: 8 Calming Bedtime Yoga Poses That Promote Deep Sleep


3. 8 Soothing Yoga Poses for Period Cramps You’ll Be Grateful For

Period cramps can feel debilitating. While heating pads and medication are common go-tos, yoga offers a surprisingly effective, natural alternative. The right poses reduce uterine tension, increase pelvic blood flow, and shift your body out of stress mode.

This nurturing flow features:

  • Supta Baddha Konasana (Reclining Butterfly Pose) for pelvic release
  • Supported Child’s Pose to rest the belly
  • Knees-to-Chest to relieve lower back pressure
  • Cat-Cow Flow to unlock spine + womb tension
  • Bridge Pose (with a pillow) to lift pressure off the pelvis
  • Savasana with gentle belly breath

Read full blog: 8 Soothing Yoga Poses for Period Cramps You’ll Be Grateful For

Organic menstrual heat patches or cozy period leggings can naturally fit in.


4. Detox Yoga Poses: 7 Cleansing Flows to Boost Digestion

Detox isn’t just a juice cleanse it’s your body’s way of clearing physical and emotional toxins. These poses aid in lymphatic drainage, twist out stored tension, and reset your digestive rhythm. The routine is especially helpful after overindulging, during PMS, or when recovering from fatigue.

Includes:

  • Revolved Triangle Pose for digestive stimulation
  • Twisting Lunge to detox the liver and gallbladder
  • Seated Spinal Twist to compress and release the abdomen
  • Camel Pose to open the chest and stimulate circulation
  • Bow Pose to activate the thyroid and digestive system
  • Supine Twist + Deep Breathing

Read full blog: Detox Yoga Poses – 7 Cleansing Flows


Emotional Wrap-Up

Healing yoga isn’t flashy. It won’t always make you sweat or stretch into crazy shapes. But in its gentle rhythm, it carries a kind of medicine one rooted in awareness, self-nourishment, and subtle transformation. Whether you’re curled up with cramps, fighting fatigue, or needing to quiet your anxious gut, these sequences remind you: you don’t have to fight your body. You can flow with it.

Let’s explore the Yoga With Adriene routines millions swear by for sleep, hips, and back pain.

Yoga With Adriene for Sleep, Back Pain & Hips (Fan Favorites)

If you’ve ever typed “yoga for pain relief” or “bedtime yoga routine” into YouTube, there’s a good chance you’ve come across Yoga With Adriene. With her calm voice, relatable energy, and free home practices, Adriene Mishler has become a global wellness icon especially for those new to yoga or struggling with stress, stiffness, and sleep.

Her videos aren’t just popular because they’re free or easy to follow. They’re powerful because they speak directly to what you’re feeling emotionally and physically. Whether it’s a sleepless night, a tight back after sitting too long, or pent-up tension in your hips from unexpressed emotions, Adriene’s yoga gently guides you home to yourself.

Let’s break down three of her most effective and beloved sequences and how they can shift your body, mind, and energy.


1. Yoga With Adriene for Sleep: 5 Relaxing Routines That Work

Sleep is the foundation of healing. And yet, so many of us carry our thoughts to bed like heavy luggage worrying, replaying, overthinking. Adriene’s bedtime flows are slow, grounded, and deeply somatic. They emphasize stillness, breath, and supported poses that down-regulate the nervous system.

This guide explores five top routines she offers:

  • Yoga for Bedtime – 20 Minutes
  • Wind Down Yoga
  • Yoga for Anxiety & Sleep
  • Yoga Nidra Practice
  • Gentle Stretch in Bed (No Mat Needed)

Each routine helps you transition from tension to tranquility using gentle spinal twists, long-held hip openers, and supported reclining poses.

Integrate calming sleep accessories like lavender eye pillows, dimmable salt lamps, or organic pillow sprays.


2. Yoga With Adriene for Back Pain: 6 Healing Poses That Work

Modern life is rough on the spine. Hours of slouching over screens, poor posture, and weak core support can leave us stiff, achy, and drained. Adriene’s back pain series is a sanctuary of relief offering both short sessions and deeper stretches for chronic issues.

Her top back-focused flows include:

  • Yoga for Lower Back Pain (20 mins)
  • Yoga for Upper Back and Neck Release
  • Yoga for Posture & Spine Alignment
  • Yoga for Sciatica Relief
  • Back Care Yoga – Daily Stretch Routine
  • Back Pain Yoga for Beginners

Each of these combines breath awareness with movements like Supine Twists, Bridge Pose, Sphinx, Cat-Cow, and Child’s Pose all safe and soothing.


3. Yoga With Adriene for Hips: 6 Gentle Openers to Release Tension

Tight hips aren’t just about sitting too much they can also store emotional stress and unresolved tension. Adriene’s hip-opening flows are deeply nurturing, helping you soften into postures that promote flexibility and emotional release.

Her top hip-targeting routines include:

  • Hip Opening Yoga – 20-Minute Flow
  • Yoga for Hips & Lower Back
  • Release & Let Go: Emotional Yoga Practice
  • Gentle Morning Hip Opener
  • Yoga for the Psoas & Hip Flexors
  • Deep Stretch for the Hips (All Levels)

Expect postures like Reclined Pigeon, Frog Pose, Low Lunge, and Happy Baby, held long enough to allow real release.

Optional Add-on: Essential oils like rose, ylang-ylang, or sandalwood to apply before this emotional release flow.


Real Talk Wrap-Up

What makes Yoga With Adriene so powerful isn’t just her soothing tone or her loyal fanbase it’s the way she meets you exactly where you are. No pressure to perform, no competition, no judgment. Just breath, movement, and deep listening.

These gentle practices don’t just stretch your body; they give your nervous system a break. They whisper to the parts of you that are overwhelmed, overworked, or quietly aching, and say: “You’re safe. Let’s soften.”

Let’s turn up the intensity with yoga that burns fat, builds strength, and awakens your inner fire…

Power & Weight Loss Yoga Poses That Actually Deliver Results

Yoga may not scream “fat burn” the way HIIT or boot camps do, but when practiced with intent and flow, it becomes a powerful sculpting and strengthening tool. Especially for those who hate going to the gym or struggle with harsh workout programs, yoga offers a sustainable, body-positive path to fitness. One where mental clarity, confidence, and flexibility grow just as much as your muscle tone.

Power-based yoga routines like Vinyasa, Power Yoga, or even Hot Yoga blend breath with movement in a way that builds internal heat, engages the full body, and sheds excess weight without pushing you into pain or exhaustion. And if you’re consistent, you’ll see changes not just in your shape but in how you carry yourself.

Here’s a breakdown of the most effective weight-loss-friendly and strength-building yoga sequences on your site, along with their internal links and natural gear integrations.


1. Yoga for Weight Loss: 11 Powerful Poses That Actually Burn Fat

Let’s be clear yoga for weight loss isn’t about “fixing” your body. It’s about reconnecting with it, building lean strength, and increasing metabolism through consistent flow. The poses in this list target key muscle groups (core, glutes, thighs, arms) and improve lymphatic circulation, digestion, and posture.

Top poses include:

  • Chair Pose (Utkatasana) for leg + core burn
  • Chaturanga Push-Up for upper body tone
  • Warrior II + Reverse Warrior for legs and obliques
  • Plank Variations for total-body strength
  • Boat Pose (see below) for deep core activation
  • Downward Dog to Cobra Flow for cardio movement
  • Goddess Pose Pulses for thigh sculpting

Read full blog: Yoga for Weight Loss – 11 Poses That Actually Burn Fat

Sweat-wicking yoga wear, core sliders, or non-slip towels for intense flow sessions.


2. Power Yoga for Beginners: 10 Energizing Poses to Build Strength

If you’re someone who thrives on challenge, Power Yoga may be your best friend. Unlike slow, passive flows, this style uses dynamic transitions and holds that increase stamina, boost circulation, and tone the full body in under 30 minutes.

This beginner-friendly guide features:

  • Plank to Down Dog to Up Dog transitions
  • Warrior Flow Series for leg and core integration
  • Dolphin Pose for shoulder and tricep strength
  • Chair to Twist Flow to build glute power
  • High Lunge with Pulses to activate hamstrings

Power yoga is also an excellent gateway for those transitioning from gym-based workouts to more mindful routines.

Read full blog: Power Yoga for Beginners – 10 Energizing Poses


3. Hot Yoga Poses: 7 Intense Moves to Sweat & Detox Fast

Hot yoga isn’t just a sweaty trend it’s a full-body therapy session. Practicing yoga in a heated environment (or even under the sun) increases caloric burn, lymphatic drainage, and mental focus. The intensity pushes you past mental blocks and into a space of real breakthrough.

Key poses include:

  • Standing Bow Pose for balance and leg tone
  • Camel Pose to open and energize the spine
  • Triangle Pose with a Twist to detox organs
  • Warrior III to fire up the glutes
  • Locust Pose to strengthen the back body

Hot yoga towels, portable fans, electrolyte drinks, or detox water bottles.


4. Boat Pose in Yoga: 5 Incredible Core Strengthening Results

If you’ve ever tried Boat Pose (Navasana), you know it’s deceptively simple. This pose targets not just the outer abs, but also deep core stabilizers, hip flexors, and your posture muscles. Mastering this pose builds inner fire both physically and mentally.

This blog outlines:

  • How to safely get into Boat Pose
  • The 5 key muscle groups activated
  • Breathing techniques to hold longer
  • Modifications for tight hamstrings
  • How to progress into Low Boat (Ardha Navasana)

Read full blog: Boat Pose in Yoga – 5 Core Incredible Strengthening Results


5. Eagle Pose Yoga: 7 Powerful Benefits for Shoulder Strength

Eagle Pose (Garudasana) may seem like a twisty balancing act but beneath the surface, it’s a shoulder-sculpting, hip-aligning, and focus-enhancing gem. It helps build mobility in frozen shoulders, stretches the upper back, and improves posture in people who sit long hours.

This blog covers:

  • Step-by-step entry into Eagle Pose
  • Modifications for knee pain
  • How it improves proprioception (body awareness)
  • Mental focus + emotional stillness benefits
  • Shoulder engagement techniques

Read full blog: Eagle Pose Yoga – 7 Benefits for Shoulder Strength


Final Words: Yoga Is a Power Tool Not Just a Peace Practice

Many still see yoga as “just stretching” or something passive. But when practiced with focus and intention, it becomes one of the most efficient, body-positive forms of strength training available. You don’t need to “kill it” to get results you just need to show up with breath, fire, and presence.

Let’s cool down from the intensity with calming chair yoga, International Yoga Day ideas, and quirky stories like… accidental farts on the mat.

Yoga for Core Strength, Balance & Flexibility

Let’s be honest many of us don’t prioritize core strength until we realize it’s affecting our balance, our posture, and even our digestion. Core muscles aren’t just about six-packs and crunches; they stabilize your entire body and support almost every yoga pose you attempt. Whether you’re sitting at a desk all day or lifting groceries awkwardly, your core is always involved. Strengthening it through yoga not only builds lean muscle but also prevents injury and enhances your overall physical confidence.

But core yoga doesn’t have to be brutal. That’s where mindful yet powerful poses like Boat Pose come in. This classic asana, also called Navasana, targets your abdominals, hip flexors, and spine without any equipment just your body and breath. Holding this pose may feel like a challenge at first, but even 30 seconds a day can yield visible results in your strength and posture.

Featured Post: Boat Pose in Yoga: 5 Incredible Core Strengthening Results

In this post, we explore how Navasana activates both deep and surface-level core muscles. You’ll learn how to protect your lower back while building endurance, and how consistent practice improves not just your abs but also your digestion and energy flow. It’s not just about the burn it’s about the stability that radiates through your entire body.

In addition to Boat Pose, there are dozens of other yoga postures that build strength holistically. Plank variations, Dolphin Pose, Crow Pose, and even Side Plank (Vasisthasana) work in unison to sculpt your abs while enhancing balance and mental focus.

Don’t worry if you can’t master them all right away. Core-focused yoga is all about progression, not perfection. Begin with what feels right, and slowly increase your hold time and breath control.

Links to Explore:

Each of these posts offers powerful options depending on your current fitness level. Whether you want slow and controlled movement or an intense, sweat-dripping flow, core-focused yoga is a rewarding path to strength, inside and out.

Next time you catch yourself slouching or struggling to stay upright in a balance pose, you’ll know exactly which yoga tools to return to. Strength starts at your center and yoga is one of the safest, most sustainable ways to build it.

Yoga with Adriene – Healing, Comfort & Emotional Relief

Sometimes, what we truly need from yoga isn’t six-pack abs or extreme flexibility it’s comfort. A gentle, reassuring voice telling us, “You’re doing just fine.” That’s why Yoga with Adriene has touched millions across the globe not just as a YouTube sensation, but as a soft, nurturing presence guiding people through the chaos of life.

Whether you’re nursing an old injury, managing emotional burnout, or simply seeking peace after a long day, Adriene Mishler’s approach to yoga is medicine for the soul. Her sessions don’t focus on perfection they focus on presence. And in today’s overstimulated world, that’s everything.

Let’s look at a few of her most healing offerings:


1. Yoga With Adriene for Sleep

One of Adriene’s most beloved sessions, this slow, floor-based routine encourages your nervous system to unwind before bed. With gentle forward folds, deep belly breathing, and stretches targeting the lower back and hips, it’s like a lullaby for your body.

Whether you struggle with insomnia or just want deeper, more restorative rest, this sequence is a game-changer. Pair it with lavender essential oil and a warm light, and you’ve got the perfect bedtime ritual.


2. Yoga With Adriene for Back Pain

Back pain is one of the top reasons people try yoga and Adriene’s beginner-friendly sequences offer massive relief. By gently stretching and strengthening the spine, these flows improve posture, reduce compression, and loosen tight muscles caused by stress or sedentary habits.

If you’re someone who sits at a desk, drives long distances, or wakes up with stiffness, you’ll fall in love with her calming cues and safe pacing.

🔗 Dive Deeper: 7 Powerful Benefits of Eagle Pose Yoga for Shoulder Strength
🔗 Related: Boat Pose in Yoga: 5 Core Strengthening Results


3. Yoga With Adriene for Hips & Emotions

Did you know we store a surprising amount of emotional tension in our hips? Adriene often guides us through slow hip openers like Pigeon Pose, the butterfly yoga pose, and Lizard Pose, encouraging the release of both physical tightness and stuck emotions.

You might cry during these sessions and that’s okay. Emotional release is part of the healing process in yoga. Her language is always gentle, reminding you to be kind to yourself and trust the flow.


Why Her Style Works for Everyone

Adriene’s genius lies in her ability to make yoga feel accessible no matter your age, body type, or emotional state. She’s not selling results. She’s inviting you to connect. Her catchphrase “Find What Feels Good” isn’t just a slogan it’s a permission slip to drop the pressure and meet yourself where you are.

Her practices often blend elements of restorative, yin, hatha, and mindful vinyasa, making them ideal for:

  • Beginners
  • People with anxiety or depression
  • Those recovering from burnout or trauma

Final Thought

If traditional yoga feels too intimidating, intense, or performative Adriene’s world is a breath of fresh air. Her energy says: “Come as you are.” And that’s exactly what the deepest kind of healing demands.

How to Choose Your Perfect Yoga Flow (+ Printable Chart & Final Tips)

You’ve now explored 25+ of the most powerful yoga poses, each tailored to your unique mood, body type, or wellness goal. But with so many incredible options how do you know where to start today?

Yoga offers numerous mental and physical benefits. According to healthline, it can improve flexibility, reduce stress, and promote overall well-being.

Which Yoga Flow Should You Try Today?

Here’s a quick guide based on your current goal or emotional state:

Mood / GoalBest Yoga StyleRecommended Poses
Feeling StressedRestorative / YinChild’s Pose, Legs-Up-the-Wall, Cat-Cow
Tired or FatiguedGentle VinyasaDownward Dog, Cobra, Seated Forward Fold
Anxious or OverthinkingGrounding Floweagle pose yoga, Tree Pose, Warrior II
Emotional Release NeededHip-Opening SequencePigeon, Lizard, Butterfly Pose
Want to Build StrengthPower YogaPlank, Boat Pose, Crescent Lunge, Chair Pose
Burn Fat / Tone BodyHIIT-Inspired YogaWarrior III, Chaturanga, Navasana
Joint-Friendly / SeniorsChair Yoga / ModifiedSeated Twist, Chair Warrior, Wrist Rolls
Better Sleep TonightBedtime YogaSupine Twist, Legs-Up-the-Wall, Belly Breathing
Need Motivation or FocusMorning FlowSun Salutations, Triangle, Camel Pose

Pro Tip: Don’t force yourself into a “perfect schedule.” Your body already knows what it needs listen to it.

Add this to your fridge, planner, or mirror it’s your visual reminder to return to yourself each day.


Final Words: Yoga That Feels Like Home

Yoga isn’t a competition.
It’s not about bending the furthest or sweating the hardest.

It’s about remembering your strength, your softness, your center.

Whether you show up for 5 minutes of breathwork or a full vinyasa flow, every practice is a return to wholeness. And that’s the beauty of these 25+ yoga poses they meet you exactly where you are, and invite you gently home.


Natural Healing Products Mentioned:

Organic Rose Essential Oil – for calming anxiety

Eco-Friendly Yoga Mat – durable, non-slip, beginner-friendly

Lavender Sleep Spray – perfect for nighttime yoga

FAQ

1. Which yoga pose is best for beginners?

The Mountain Pose (Tadasana) is ideal for beginners. It helps establish balance, posture awareness, and breathing alignment, making it a foundational asana to start with.

2. What yoga pose helps relieve stress the fastest?

Child’s Pose (Balasana) is deeply calming and instantly helps reduce stress by grounding the body and focusing your breath inward.

3. Can I do yoga even if I’m not flexible?

Absolutely. Yoga is meant to increase flexibility over time. Poses like Butterfly, Cat-Cow, and Chair Yoga are ideal for beginners with tight muscles.

4. What are the best yoga poses for weight loss?

Powerful poses include Boat Pose, Plank Pose, Warrior Series, and Downward Dog. Flow sequences like Vinyasa or Power Yoga burn calories efficiently.

5. Is yoga suitable during menstruation?

Yes, but avoid inversions like Shoulder Stand. Instead, try soothing poses like Reclining Butterfly, Child’s Pose, and Supine Twist for pain relief.

6. What yoga poses can improve digestion?

Wind-Relieving Pose, Seated Twist, and Supine Twist all gently massage your internal organs and improve gut mobility, easing bloating.

7. Are there yoga poses I can do with my partner?

Yes! Try 2-person poses like Double Boat, Partner Tree, or Twin Forward Fold. These build trust, balance, and are super fun.

8. What’s the most energizing yoga pose?

The Camel Pose (Ustrasana) opens your chest and lungs, delivering an instant boost of energy by improving oxygen intake and posture.

9. Which yoga pose helps with sleep?

Legs-Up-The-Wall Pose (Viparita Karani) is calming and regulates the nervous system, preparing your body for deep relaxation and sleep.

10. How often should I do yoga?

Even practicing 15–20 minutes daily can offer tremendous results. Ideally, 3–5 times a week is great for strength, flexibility, and mental clarity.

Disclaimer:

This article is for informational purposes only and not intended as medical advice. Please consult your doctor before beginning any new exercise or wellness routine. Some links may be affiliate links, which means we may earn a small commission at no extra cost to you.

7 Powerful Benefits of Eagle Pose Yoga for Shoulder Strength

Reflecting on my yoga journey, I remember the power of Garudasana, or Eagle Pose. This posture has strengthened my shoulders and improved my balance and posture.

Adding Eagle Pose Yoga to my practice has boosted my shoulder strength and well-being. In this article, I’ll show you how to master Garudasana. If you’re new to yoga practice, it helps to understand the foundations of breathing, posture, and alignment explained in this complete yoga guide for beginners. We’ll explore its benefits for yogis at all levels.

Key Takeaways

  • Discover the benefits of Garudasana for shoulder strength
  • Learn how to master Eagle Pose Yoga safely and effectively
  • Improve your overall posture and balance with this foundational posture
  • Explore the numerous benefits of Garudasana for yogis of all levels
  • Enhance your overall well-being through the practice of Eagle Pose

Understanding Eagle Pose Yoga (Garudasana)

Exploring Eagle Pose reveals its deep history and importance in yoga today. Garudasana, or Eagle Pose, is a pose that combines physical stance, balance, and mental focus.

The Ancient Origins of Eagle Pose

Eagle Pose comes from ancient yoga traditions. It was valued for boosting physical and mental health. The name “Garudasana” comes from “Garuda,” meaning eagle, and “asana,” meaning pose. This pose is inspired by the mythical bird Garuda, known for strength, courage, and agility.

Why Eagle Pose Is Essential for Modern Practitioners

In today’s fast world, Eagle Pose offers a break from stress. It helps improve balance, both physically and mentally. By adding Garudasana to their routine, people can better their shoulder mobility and physical alignment. Eagle Pose is also commonly included among the best yoga poses for improving balance, flexibility, and upper body strength.

Key Anatomical Focus Areas

Eagle Pose mainly works on the shoulders, upper back, and legs. These areas are key to experiencing benefits like:

  • Improved balance and stability
  • Enhanced shoulder mobility
  • Strengthened legs and ankles
  • Increased focus and mental clarity

Knowing the origins and benefits of Eagle Pose, or Garudasana, shows its worth in yoga today. It helps us improve our well-being.

How to Perform Eagle Pose Yoga Correctly

Getting Eagle Pose right is key to enjoying its benefits and avoiding injuries. Eagle Pose yoga, or Garudasana, is a challenging pose that needs focus and practice.

Preparation and Starting Position

Start by standing with your feet apart, core tight, and spine straight. Breathe in deeply, then exhale and bend your knees slightly.

Step-by-Step Instructions for Arms and Shoulders

  • Extend your arms straight out to the sides, parallel to the floor.
  • Bend your elbows, bringing your forearms and hands towards each other.
  • Wrap your right arm over your left, with your palms facing each other.
  • Try to bring your palms together, or as close as you can, in a prayer-like gesture.

This arm position improves shoulder mobility and helps release upper back tension.

Step-by-Step Instructions for Legs and Core

  1. Cross your right knee over your left, so your right foot is by your left calf.
  2. Wrap your legs around each other, engaging your core to maintain balance.
  3. Keep your weight evenly distributed on both feet, or as much as possible given your flexibility.

Engaging your core and maintaining a steady focus yoga practice will help you stabilize in the pose.

Breathing Techniques During Eagle Pose

Once in the pose, focus on your breathing. Take slow, deep breaths in through your nose and out through your mouth. Keep your breathing steady and calm to stay centered and focused.

How to Exit the Pose Safely

To exit Eagle Pose, slowly unwrap your arms and legs, returning to a standing position. Take a deep breath in, and as you exhale, release any tension in your shoulders and arms. Repeat the pose on the other side to maintain balance.

By following these steps and practicing regularly, you can improve your technique and enjoy the many benefits of Eagle Pose yoga, including enhanced shoulder mobility and a stronger, more focused practice.

The 7 Powerful Benefits of Eagle Pose for Shoulder Strength

Eagle Pose is a key yoga pose that makes your shoulders stronger. It also helps your posture and makes your upper body more flexible. Doing Garudasana often can really boost your shoulder strength and overall health.

1. Strengthens Shoulder Muscles and Rotator Cuff

Eagle Pose works the muscles of your shoulder and rotator cuff. It makes them stronger through a special contraction. This can make your shoulders more stable and lower the chance of getting hurt.

2. Improves Shoulder Mobility and Range of Motion

Eagle Pose stretches and strengthens your shoulder muscles. This improves how well your shoulders move and how flexible they are. It can also make your shoulders less stiff.

3. Releases Tension in Upper Back and Shoulders

Doing Eagle Pose can help loosen up your upper back and shoulders. These areas often get tight and stressed. Regular practice can make your upper body feel more relaxed and open.

4. Enhances Posture and Spinal Alignment

Eagle Pose helps you stand up straighter by strengthening your spine’s supporting muscles. It also improves how your spine lines up. This can lead to better posture and less back pain.

5. Builds Isometric Strength in Upper Body

The special contraction in Eagle Pose builds strength in your upper body. This is great for your shoulders and arms. It can make your upper body stronger and more able to last longer. Many dynamic routines such as power yoga for beginners also incorporate balance poses like Eagle Pose to build upper body endurance and stability.

6. Prevents Shoulder Injuries and Pain

Eagle Pose makes your shoulder muscles stronger and more mobile. This can prevent injuries and pain in your shoulders. Regular practice can make your shoulders healthier and more resilient.

7. Creates Balance Between Shoulder Muscle Groups

Eagle Pose balances the different muscles in your shoulders. This reduces the risk of overuse injuries. Keeping your shoulders balanced is key to keeping them healthy.

In conclusion, adding Eagle Pose to your yoga routine can greatly improve your shoulder strength and upper body health. By understanding and using the benefits of this pose, you can make your practice better. You’ll enjoy a stronger and more flexible upper body.

How Eagle Pose Yoga Relieves Shoulder Tension and Stiffness

Eagle Pose Yoga helps ease shoulder tension. It’s a powerful pose for improving shoulder health. This makes it a great tool for those with discomfort.

Targeting Chronic Shoulder Tightness

Eagle Pose is great for chronic shoulder tightness. The pose stretches the arms and legs together. This stretch can greatly improve shoulder flexibility.

Breaking Up Fascial Adhesions

The pose also helps break up adhesions in the shoulders. These adhesions can limit movement and cause pain. Eagle Pose gently stretches and releases them, promoting healthier fascia.

Increasing Blood Flow to Shoulder Region

Eagle Pose boosts blood flow to the shoulders. Holding the pose encourages blood circulation. This is key for healing and keeping joints healthy.

My Personal Experience with Shoulder Recovery

I’ve seen Eagle Pose ease shoulder tension. Regular practice has reduced my stiffness. This makes moving easier and less painful.

“Eagle Pose has been a lifesaver for my shoulder pain. It’s a simple yet effective way to keep my shoulders loose and healthy.”

Many yogis share this positive experience with Eagle Pose.

Try Eagle Pose to see its benefits for yourself. It’s great for easing shoulder tightness, improving mobility, or just making your yoga better.

Eagle Pose for Improved Balance and Concentration

The Eagle Pose is more than a physical challenge. It also tests your mental focus and balance. As you practice, you’ll feel a stronger connection between your mind and body. This will improve your yoga practice overall.

How Eagle Pose Challenges Your Balance

Eagle Pose makes you stand on one leg while wrapping arms and legs around each other. This pose requires your core and leg muscles to work together. It boosts your balance and stability.

As you practice, you’ll get better at balancing in other poses and daily activities.

Mental Focus Benefits of Garudasana

Garudasana, or Eagle Pose, helps improve your mental focus. It makes you concentrate on your breath and body sensations. This improves your mental clarity and discipline.

This focus can help you in other areas of life. It can make you more productive and improve your overall well-being.

“The mind is everything; whatever you think, you become.” – Buddha

The Mind-Body Connection in Eagle Pose

Eagle Pose strengthens the connection between your mind and body. It requires you to be fully present and aware of your body’s position and sensations. As you practice, you’ll understand your body’s strengths and weaknesses better.

By adding Eagle Pose to your yoga routine, you’ll boost your balance and concentration. You’ll also improve your mental and physical health. The benefits of this pose will go beyond your yoga mat, positively affecting your daily life.

Eagle Pose Yoga Benefits for Upper Body Flexibility

When I do Eagle Pose, I see my upper body getting more flexible. This is key for a good yoga practice. It helps stretch the shoulders, upper back, and arms.

Opening the Space Between Shoulder Blades

Eagle Pose stretches the muscles between the shoulder blades. This opens up the upper back. It also helps improve your posture and eases neck and shoulder tension.

Increasing Mobility in Shoulder Joints

Practicing Eagle Pose makes your shoulder joints more mobile. The arms wrap deep, stretching the muscles. This boosts shoulder mobility.

Stretching the Wrists and Forearms

Eagle Pose also stretches the wrists and forearms. This is great for people who type a lot or do activities that hurt these areas.

Creating Length in the Upper Back

Eagle Pose Yoga stretches the upper back, making it longer. This improves flexibility and posture. It also helps reduce back pain.

Doing Eagle Pose Yoga regularly can greatly improve upper body flexibility. It’s a must-have in any yoga routine. It enhances shoulder mobility and overall flexibility.

Common Mistakes to Avoid in Eagle Pose

Practicing Eagle Pose safely means knowing and avoiding common errors. This pose, known as Garudasana, improves balance and focus. But, mistakes in alignment and technique can cause discomfort or injury. Being aware of these issues can make your practice better and more rewarding.

Improper Arm Alignment

One big mistake in Eagle Pose is wrong arm alignment. This can strain your shoulders and ruin the pose. Make sure your arms are wrapped right, elbows at shoulder height, and hands together. Proper arm alignment is key for balance and getting the most from the pose.

Lower Body Positioning Errors

Getting the lower body right in Eagle Pose is also critical. Mistakes like knees extending past toes or not engaging the core can destabilize you. To fix this, keep your knees bent and weight evenly on both legs. Engaging your core will help stabilize your lower body and improve balance.

Breathing and Focus Issues

Breathing and focus are vital in Eagle Pose. Holding your breath or losing focus can reduce the pose’s benefits. Practice deep, controlled breathing to stay focused and calm. This will help you stay present and centered in the pose.

Overstraining the Shoulders

Another common mistake is overstraining the shoulders in Eagle Pose. Forcing your shoulders beyond their limit can cause strain or injury. Be careful with your shoulder position and avoid pushing past what feels right. Instead, gradually work on increasing your flexibility over time, and use modifications if needed to protect your shoulders.

By knowing these common mistakes and avoiding them, you can practice Eagle Pose more safely and effectively. This way, you can enjoy its many benefits for your body and mind.

Modifications and Variations for All Levels

Eagle Pose is great for everyone, from beginners to experts. It can be adjusted to fit your level, making it super useful for all yogis.

Beginner-Friendly Adaptations

If you’re new to Eagle Pose, start with simpler versions. Stand with your feet apart for balance. Use a block to support your arms for better alignment. These changes help you learn the basics without stress.

Intermediate Progressions

When you get better at Eagle Pose, try more challenging versions. You can stretch deeper, use your core more, or hold the pose longer. Intermediate yogis can also play with arm and leg positions to improve balance and strength.

Advanced Eagle Pose Variations

For experts, Eagle Pose has tough variations. Two examples are:

  • The Flying Eagle Variation, where you lift off the ground and balance on one leg.
  • The One-Legged Eagle Arm Balance, a pose that needs lots of strength, flexibility, and focus.

Flying Eagle Variation

The Flying Eagle Variation is thrilling but tough. It needs strong legs and a steady core. Keep your core tight and your eyes focused.

One-Legged Eagle Arm Balance

The One-Legged Eagle Arm Balance is a big challenge. It requires precision, strength, and control. Be patient and keep practicing.

Using Props to Support Your Practice

Props are key for a safe and strong Eagle Pose practice. Blocks, straps, and walls help keep you aligned and prevent injuries. Using props shows you’re mindful and focused, not limited.

Conclusion

Eagle Pose Yoga, or Garudasana, is great for yogis of all levels. It strengthens your shoulders and improves your posture. It also helps you balance, focus, and become more flexible.

If you’ve tried Eagle Pose, you know its power. It’s time to add it to your daily yoga routine. Regular practice will boost your shoulder strength, reduce tension, and improve your overall health.

Whether you’re new to yoga or have been practicing for years, try Eagle Pose Yoga. It’s easy to do and offers many benefits. Garudasana is a wonderful addition to any yoga practice.

FAQ

1. What are the benefits of practicing Eagle Pose (Garudasana) for shoulder strength?

Eagle Pose strengthens your shoulder muscles and rotator cuff. It also boosts shoulder mobility. Plus, it helps release tension in your upper back and shoulders.

2. How do I properly align my arms in Eagle Pose?

Wrap your arms around each other in Eagle Pose. Hold your palms together like in prayer. Make sure not to cross your arms too high or too low.

3. Can Eagle Pose help with shoulder tension and stiffness?

Yes, Eagle Pose can ease shoulder tension and stiffness. It targets chronic tightness, breaks up adhesions, and boosts blood flow to the shoulders.

4. Is Eagle Pose suitable for beginners?

Yes, beginners can modify Eagle Pose. Using props or simpler adaptations makes it more accessible.

5. How can I improve my balance in Eagle Pose?

Focus on your breath to improve balance in Eagle Pose. Engage your core. Regular practice builds strength and stability.

6. Can Eagle Pose help improve my posture?

Yes, Eagle Pose can improve your posture. It strengthens your shoulder muscles. This enhances your upper body alignment.

7. What are some common mistakes to avoid in Eagle Pose?

Avoid common mistakes in Eagle Pose. Don’t misalign your arms or position your lower body wrong. Also, watch your breathing and focus. And don’t strain your shoulders too much.

Disclaimer:

This post may contain affiliate links. If you purchase through them, we may earn a small commission at no extra cost to you. Also, this content is for informational purposes only and does not substitute professional medical advice.

Tai Chi for Physical and Mental Well-Being: Restore Balance Through Gentle Movement

Tai Chi for physical and mental well-being offers more than gentle exercise it’s a deeply healing practice rooted in ancient wisdom. With flowing, mindful movements and breathwork, it nurtures body and mind, supporting emotional clarity, stress relief, and physical vitality.


1. Tai Chi for Physical and Mental Well-Being: A Healing Practice for Mind and Body

Tai Chi is a deeply transformative form of exercise that blends slow, flowing movements with focused breathing and mental concentration. Tai Chi improves mental and physical well‑being
.

Often referred to as “meditation in motion,” Tai Chi not only strengthens the body but also calms the mind. It creates a unique balance between physical and mental well-being.

Rooted in Traditional Chinese Medicine (TCM), Tai Chi enhances the body’s Qi (life energy) flow, promoting vitality and reducing stress.

In today’s fast-paced world, it offers a peaceful, low-impact way to reconnect with your body and mind.

References:

  • “Start your Tai Chi journey with a beginner’s guide like the Tai Chi for Beginners DVD by Dr. Paul Lam.”

Supplement suggestions:

  • “Support relaxation with a calming herbal tea like Traditional Medicinals Organic Chamomile Tea.”

Recommended Course:

  • “Learn the basics of Tai Chi with the Tai Chi for Beginners Course on Udemy.”

2. The Benefits of Tai Chi

  • Enhances Physical Health: Tai Chi is a low-impact exercise that promotes balance, flexibility, and overall physical well-being. It strengthens muscles, improves joint mobility, and boosts cardiovascular health without putting strain on the body.

  • Improves Mental Clarity: The mindful movements of Tai Chi require concentration and focus, helping to clear the mind and reduce mental clutter. It enhances mental clarity and fosters a sense of calm and tranquility.

  • Promotes Emotional Balance: As a meditative practice, Tai Chi also supports emotional health by reducing stress and anxiety. The flowing movements, combined with deep breathing, encourage relaxation and emotional stability.

  • Supports Energy Flow: Tai Chi is based on the concept of Qi, or life energy, which flows through the body. By practicing Tai Chi, you improve the flow of energy, promoting physical vitality and emotional well-being.

References:

  • “Try the YogaDirect Tai Chi Mat for a comfortable surface to practice on.”

Supplement suggestions:

  • “Promote relaxation with a magnesium supplement like Natural Vitality Calm.”

Recommended Course:

  • “Explore the Tai Chi for Stress Relief Course on Mindbodygreen to learn techniques for calming the mind.”

3. Tai Chi for Stress Relief and Mental Wellness

In today’s fast-paced world, stress has become an all-too-common issue for many people, affecting both mental and physical health. Tai Chi for stress relief offers a holistic approach to combating this widespread problem. This ancient practice emphasizes mindfulness, deep breathing, and slow, intentional movements, making it an effective tool for reducing stress and promoting overall mental wellness.

By focusing on the present moment and synchronizing your movements with breath, Tai Chi helps activate the parasympathetic nervous system the part of the body responsible for promoting relaxation and reducing the fight-or-flight response. This process helps to lower cortisol levels, the stress hormone, while also enhancing mood and emotional balance. The gentle, flowing movements encourage a sense of calm and tranquility, allowing the mind to quiet and the body to release tension.

For those searching for natural and non-invasive ways to manage stress, Tai Chi provides an ideal solution. Unlike other forms of exercise that may cause further strain on the body or mind, Tai Chi offers a low-impact practice that is accessible for people of all ages and fitness levels. Regular practice can foster mental clarity, emotional resilience, and a profound sense of well-being.

References:

  • “Create a calming space for Tai Chi with an essential oil diffuser like the [URPOWER Essential Oil Diffuser.”

Supplement suggestions:

  • “Support relaxation with a stress-relief supplement like Olly Goodbye Stress Gummies.”

Recommended Course:

  • “Join the Tai Chi for Mental Wellness Course on Gaia to learn specific techniques for stress relief.”

4. Tai Chi for Physical Health: Balance, Strength, and Flexibility

Tai Chi is an excellent practice for improving physical health, particularly for older adults or individuals recovering from injury. The slow, controlled movements help enhance balance, increase strength, and improve flexibility in a safe and low-impact manner. As a full-body exercise, Tai Chi engages the muscles, joints, and tendons without placing unnecessary strain on the body, making it ideal for those with joint issues or chronic conditions.

The focus on balance in Tai Chi is particularly beneficial for reducing the risk of falls, a common concern for older adults. The gentle, deliberate movements help strengthen stabilizing muscles and improve coordination, leading to better posture and overall body alignment. Additionally, Tai Chi helps enhance joint mobility, making it easier to perform daily activities without discomfort.

As you age, staying active and mobile is key to maintaining your independence and overall well-being. Tai Chi offers a safe and effective option for those looking to stay fit, flexible, and agile, without the risks associated with high-impact exercises. Whether you’re looking to recover from an injury or maintain your mobility as you age, Tai Chi is a fantastic way to support your body’s physical health and vitality.

References:

  • “Enhance your practice with a Tai Chi instructional book like The Harvard Medical School Guide to Tai Chi.”

Supplement suggestions:

  • “Support joint health with a collagen supplement like Vital Proteins Collagen Peptides.”

Recommended Course:

  • “Learn how to improve balance and strength with the Tai Chi for Seniors Course on Udemy.”

5. How to Get Started with Tai Chi: A Simple Guide for Beginners

Getting started with Tai Chi is easy, and the beauty of this practice lies in its simplicity no special equipment or prior experience is necessary. Tai Chi is accessible to people of all ages and fitness levels, making it an ideal practice for anyone looking to improve balance, strength, and mental wellness. Here are some helpful tips to begin your Tai Chi journey:

1. Find a Class

If you’re new to Tai Chi, one of the best ways to start is by joining a Tai Chi class. Look for classes offered at community centers, gyms, or wellness studios in your area. In-person classes give you the opportunity to learn proper techniques and get personalized feedback from an experienced instructor. Many instructors also offer beginner-friendly sessions, making it easy to ease into the practice.

2. Practice at Home

If you prefer learning at your own pace, you can also begin practicing Tai Chi at home. There are plenty of online Tai Chi videos and DVDs that guide you through the basic movements and routines. Starting with short, simple sessions can help you gradually get familiar with the techniques and build confidence. As you become more comfortable, you can increase the duration and complexity of your practice.

3. Start Slow

Tai Chi is all about slow, deliberate movements. Begin with short sessions (10-15 minutes) and gradually increase the time as you get more comfortable with the movements. Starting slow helps you focus on form, balance, and mindfulness without feeling overwhelmed. Over time, you’ll notice improvements in your flexibility, strength, and mental clarity.

4. Focus on Breath

One of the most important aspects of Tai Chi is coordinating movement with breath. Deep, slow breathing enhances relaxation and mindfulness, allowing you to be more present in your practice. As you move through the forms, focus on your breath, allowing it to guide your actions and promote a sense of calm and well-being.

5. Consistency is Key

The key to success in Tai Chi is consistent practice. Make it a part of your daily routine, even if it’s just for a few minutes each day. Over time, you’ll begin to notice improvements in your physical health, mental wellness, and overall sense of balance.

References:

  • “Try the BodyWisdom Tai Chi for Beginners DVD for easy-to-follow instructions.”

Supplement suggestions:

  • “Support your energy levels with a plant-based protein powder like Garden of Life Sport Organic Plant-Based Protein.”

Recommended Course:

  • “Join the Tai Chi for Beginners Course on Udemy to learn step-by-step techniques.”

Conclusion

Tai Chi is a gentle yet powerful practice that offers numerous benefits for physical, mental, and emotional health. By incorporating Tai Chi into your daily routine, you can reduce stress, improve balance, and enhance overall well-being. Whether you’re new to Tai Chi or looking to deepen your practice, this ancient art provides a holistic path to health that aligns perfectly with modern wellness trends.


Call to Action:

“Ready to experience the benefits of Tai Chi? Explore our top-rated books, courses, and tools here and start your journey to better health today!”


FAQ

1. Is Tai Chi suitable for beginners?

Yes, Tai Chi is highly beginner-friendly and can be adapted to all fitness levels. Its slow, controlled movements make it easy to learn and practice, and it’s a gentle way to improve flexibility, balance, and overall well-being. Whether you’re new to exercise or looking for a low-impact activity, Tai Chi is an excellent choice.

2. How often should I practice Tai Chi?

For beginners, aim for 2-3 sessions per week to start, gradually increasing the duration and frequency as you become more comfortable with the movements. Consistency is key to seeing improvement, so try to incorporate it into your routine. Even short sessions (10-15 minutes) can offer benefits for balance, strength, and mental clarity.

3. Can Tai Chi help with chronic pain?

Yes, Tai Chi for chronic pain is a proven practice that can significantly improve flexibility and reduce pain, especially in conditions like arthritis. The gentle, low-impact movements of Tai Chi help ease muscle tension, improve joint mobility, and alleviate discomfort without placing strain on the body. It’s a safe and natural way to manage chronic pain while promoting overall health.

4. Do I need special equipment to practice Tai Chi?

No, Tai Chi requires no special equipment. All you need is comfortable clothing that allows free movement and a quiet, peaceful space to practice. Tai Chi can be practiced anywhere whether in your living room, a park, or a dedicated wellness studio making it a convenient and accessible form of exercise.

5. Can Tai Chi improve mental health?

Absolutely! Tai Chi for mental health is widely recognized for its ability to reduce stress, anxiety, and depression. The meditative aspect of Tai Chi encourages deep, mindful breathing and relaxation, helping to calm the mind. Regular practice can also improve focus, enhance emotional balance, and provide a sense of peace and well-being.


Disclaimer

This article is for informational purposes only and is not intended to replace professional medical advice, diagnosis, or treatment. Always consult with a healthcare provider before starting any new exercise or wellness practice, especially if you have pre-existing health conditions. Some links in this article are affiliate links, which means we may earn a small commission if you purchase through them at no extra cost to you. This helps support our work and allows us to continue providing valuable content. Thank you for your support!

Exit mobile version